The Filling Station has a regular internet update and newsletter which is sent to all customers.
I was pretty chuffed when without prior knowledge, the Chev was included in the November update.
http://emailer.emailroi.com/r.pl?8THFe7jgSlyUTc3R_dab935d25d68bd24

Monday, June 6, 2011


2010 - August - Steering Box
Cleaned out the steering box, made new gaskets, filled with locally made Penrite Vintage Steering Box Oil/ Steering Box Lubricant.
Self levelling / Flows / Very Sticky and is said to be leak resistant. So far so good. Lets see.
http://www.penriteoil.com.au/products/classic-car-oil/steering_box_lubricant
Self levelling / Flows / Very Sticky and is said to be leak resistant. So far so good. Lets see.
http://www.penriteoil.com.au/products/classic-car-oil/steering_box_lubricant
2010 - July - Installing a Thermostat
I decided to fit a thermostat, for the first time in 35 years to see what if any difference would be as postings on the USA Chev sites indicated the engine would run better with one fitted.
I checked my spare housings. The first was too corroded to use, two were usable and one required thread repair to be usable. I discounted the housing that was on my engine was I assumed the threads would be full of rust, broken bolts etc, and the plan was to do a quick swap over.
Over the last two weeks I derusted three housings and surface ground the gasket faces. One housing was put to one side as the threads were stripped, which left me 2 to choose from. The first one had good threads but a corroded radiator hose inlet. The other unit had fair threads and a good radiator hose inlet.
I attempted to fit a thermostat in the housing with fair threads, and you guessed it. The last bolt. The last 1/8 of a turn and it stripped the thread.Tried the second housing and it went fine. I was concerned with the corrosion on the radiator hose inlet, but pushed on regardless. All systems ready to fit in the morning.
Removed the existing housing, and was surprised to see the inside the least corroded of the lot. I then ran a tap through the threads and they were excellent. So after spending 2 weeks preparing housings to do a swap over, I ended up using the housing that was on the engine.
What can you say?
All is well that ends well. I have several spare housings that with minor work are serviceable.
With the thermostat fitted, the Chev now warms up quicker and seems to hold a more consistent temperature.
In the picture below, its not hard to see the one that has not been rust treated.

I checked my spare housings. The first was too corroded to use, two were usable and one required thread repair to be usable. I discounted the housing that was on my engine was I assumed the threads would be full of rust, broken bolts etc, and the plan was to do a quick swap over.
Over the last two weeks I derusted three housings and surface ground the gasket faces. One housing was put to one side as the threads were stripped, which left me 2 to choose from. The first one had good threads but a corroded radiator hose inlet. The other unit had fair threads and a good radiator hose inlet.
I attempted to fit a thermostat in the housing with fair threads, and you guessed it. The last bolt. The last 1/8 of a turn and it stripped the thread.Tried the second housing and it went fine. I was concerned with the corrosion on the radiator hose inlet, but pushed on regardless. All systems ready to fit in the morning.
Removed the existing housing, and was surprised to see the inside the least corroded of the lot. I then ran a tap through the threads and they were excellent. So after spending 2 weeks preparing housings to do a swap over, I ended up using the housing that was on the engine.
What can you say?
All is well that ends well. I have several spare housings that with minor work are serviceable.
With the thermostat fitted, the Chev now warms up quicker and seems to hold a more consistent temperature.
In the picture below, its not hard to see the one that has not been rust treated.

2010 - June - Chev's First Press Article (New member of the DVHCC)
Many thanks to Peter Gabe for ther great member profile of the Chev and I when my wife Jan and I joined the DVHCC http://www.dvhcc.com.au/   |
2010 - May - New Plugs - New Lease of Life
I must thank Kevin Smith from NSW, who amongst many other tips suggested I try Auto lite 3077 plugs. For the last 33 years I had been running W14's, and embarrassed to say I did not know any better. I had even done 700 mile rally etc, with no problems, apart from having to clean the plugs every 100 miles.
I fitted a set of 3077's and the engine idled better, had a better exhaust note, was more responsive, and pull better on hills.
The only drama I encountered during test runs was the engine developed a short miss within half a mile of the same spot on each run. I would pull up, the engine would run a bit rough for 1 to 2 seconds and then would be fine.
Thinking this must be a fuel starvation problem, I removed the in line filter and one way valve fitted just before the vac tank, however this made no difference. The miss was still there, at approximately the same location during the test run.
Before accepting it was a fuel problem, I fitted the W14's. No sign of a miss at any stage. I then fitted the W18's and engine miss was worse. Fitted the 3077's, and the miss returned. I tried retarding the engine when the miss started, and it got worse.
I then Increased the gap on 3077's to 35 thou. The miss occurred earlier, and engine ran rough on fully advanced. I then fitted the W18's with an increased gap of 35 thou. The miss occurred earlier, and the engine ran rough on fully advanced. Refitted the W14's with normal gap of 30 thou and engine runs fine, no miss, but not as much power as the 3077's
I reconnected the in line filter and one way valve, engine runs fine. I eliminated fuel as a cause, and suspected either coil, condenser or timing. I replaced the points, condenser, rotor button, distributor cap and coil, however the miss was still there with the 3077's.
I then had a break through after doing nearly 100 miles of testing in a week, but had not been more than 5 kilometers from home.
The penny dropped. I think its TIMING.
I did 2 runs with the 3077’s fully retarded, driving it very hard, pulling up hills at 20 mph etc, with no miss present at any stage.
I then did a run, fully advanced, exact same miss, exact same spot, pulled up, rough idle for 1 to 2 seconds then fine again all the way home.
Just to confirm, did another run fully retarded, no miss.
The problem was solved by running another series of test runs, slightly advancing the engine a bit more on each run. When the missed occurred, I retarded the engine to the previous setting and this became the new fully advanced position.
Problem solved, has never missed since.
In summary, after running W14's in my 28 Chev for over 30 years, then changing to Auto lite 3077's, a long reach plug, the Chev has never run better. The difference in starting, smoother running and pulling power on hills are the areas of improvement. I now start the engine with partial choke, and once started, no choke and fully advanced. No more fouling of the plugs, but you must ensure the ignition timing is spot on. Others also recommend 3077's, and there are other brand equivalents to 3077's that should perform as well.
Other Chev owners have mentioned Champion W89D, AC Delco 18, Motorcraft 101, Champion 589, GM 5613050 as equivalents but as I have never tried them, I can only personally recommend 3077's
I fitted a set of 3077's and the engine idled better, had a better exhaust note, was more responsive, and pull better on hills.
The only drama I encountered during test runs was the engine developed a short miss within half a mile of the same spot on each run. I would pull up, the engine would run a bit rough for 1 to 2 seconds and then would be fine.
Thinking this must be a fuel starvation problem, I removed the in line filter and one way valve fitted just before the vac tank, however this made no difference. The miss was still there, at approximately the same location during the test run.
Before accepting it was a fuel problem, I fitted the W14's. No sign of a miss at any stage. I then fitted the W18's and engine miss was worse. Fitted the 3077's, and the miss returned. I tried retarding the engine when the miss started, and it got worse.
I then Increased the gap on 3077's to 35 thou. The miss occurred earlier, and engine ran rough on fully advanced. I then fitted the W18's with an increased gap of 35 thou. The miss occurred earlier, and the engine ran rough on fully advanced. Refitted the W14's with normal gap of 30 thou and engine runs fine, no miss, but not as much power as the 3077's
I reconnected the in line filter and one way valve, engine runs fine. I eliminated fuel as a cause, and suspected either coil, condenser or timing. I replaced the points, condenser, rotor button, distributor cap and coil, however the miss was still there with the 3077's.
I then had a break through after doing nearly 100 miles of testing in a week, but had not been more than 5 kilometers from home.
The penny dropped. I think its TIMING.
I did 2 runs with the 3077’s fully retarded, driving it very hard, pulling up hills at 20 mph etc, with no miss present at any stage.
I then did a run, fully advanced, exact same miss, exact same spot, pulled up, rough idle for 1 to 2 seconds then fine again all the way home.
Just to confirm, did another run fully retarded, no miss.
The problem was solved by running another series of test runs, slightly advancing the engine a bit more on each run. When the missed occurred, I retarded the engine to the previous setting and this became the new fully advanced position.
Problem solved, has never missed since.
In summary, after running W14's in my 28 Chev for over 30 years, then changing to Auto lite 3077's, a long reach plug, the Chev has never run better. The difference in starting, smoother running and pulling power on hills are the areas of improvement. I now start the engine with partial choke, and once started, no choke and fully advanced. No more fouling of the plugs, but you must ensure the ignition timing is spot on. Others also recommend 3077's, and there are other brand equivalents to 3077's that should perform as well.
Other Chev owners have mentioned Champion W89D, AC Delco 18, Motorcraft 101, Champion 589, GM 5613050 as equivalents but as I have never tried them, I can only personally recommend 3077's
2010 - April - Rear Wheels Fixed For Good (at last)
I had not been happy with the fit of the reproduction spokes in the rear wheels for many years, but had not been motivated to tackle the job again. I had made several attempts during the 80's and 90's with only limited success.
I finally plucked up the courage to pull down the wheels and get the job done right once and for all.
Turned out to be just in time as the old worn hubs were starting to move on my 3 year old replacement axles. If the job had been delayed a bit longer I am sure there would have been damage done to the key ways.
Luckily the wear was confined to the keys. The wheel which had overheated and smoked the brakes during the March DVHCC rally was very hard to remove, and nearly broke my wheel puller. I suspect that when it overheated, it expanded and went further on the taper.
I have included a series of photos to detail the work that was done and the difference between the old and new hubs is noticeable.


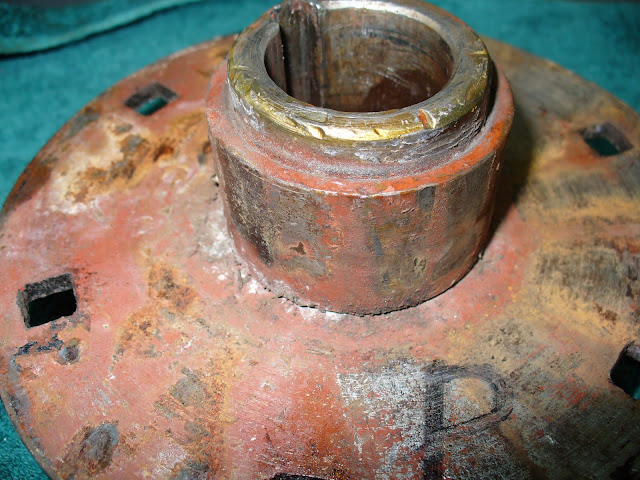
I discovered that the Australian Hubs of which I have 2 pair have a slight recess for the bolt head, and my NOS ones from the States are flush. No other differences were apparent.

After several weeks I finished refurbishing the rear wheels. As well as fitting NOS hubs I had to contend with loose spokes on both wheels. After removing the old hub, and with the spokes still fitted to the rim I applied several coats of Chair - Loc to the area of the spokes that is covered by the hub and brake drum. Chair Loc was mentioned in great detail on the model T web site and works as follows - " Expands the grain and leaves a hard deposit inside the expanded grain of the timber". And to my amazement it worked!
I fitted the new hub with several layers of brass shim wrapped around the centre of the hub that contacts the end of the spokes. Another coat of Chair Loc, then fitted the brake drum. Where the spokes fit into the outer rim, several where loose, so I drilled a 9 mm hole into the spoke about 2 inches long and hammered in a 9.5mm dowel covered in Araldite. Resprayed a final coat of black on the hub outer face, and then a coat of Acrylic clear. The outer rim was still in its original coat of black from 3 years ago, and this also got the clear Acrylic top coat, which really brought the surface back up to a new appearance. The job was finished with a coat of clear to freshen up the spokes. Very happy with the finish. These were reproduction spokes from about 36 years ago that I have never been 100% happy with. Lets hope this time I have solved the problem.
The spokes are now as tight as a drum, and if hit with a hammer ( from behind of course) the sound is more metallic than wooden.
With the new hubs replacing the old worn ones I estimate i have increased the track between the rear wheels by approx 1/2 ".


I finally plucked up the courage to pull down the wheels and get the job done right once and for all.
Turned out to be just in time as the old worn hubs were starting to move on my 3 year old replacement axles. If the job had been delayed a bit longer I am sure there would have been damage done to the key ways.
Luckily the wear was confined to the keys. The wheel which had overheated and smoked the brakes during the March DVHCC rally was very hard to remove, and nearly broke my wheel puller. I suspect that when it overheated, it expanded and went further on the taper.
I have included a series of photos to detail the work that was done and the difference between the old and new hubs is noticeable.


I discovered that the Australian Hubs of which I have 2 pair have a slight recess for the bolt head, and my NOS ones from the States are flush. No other differences were apparent.

After several weeks I finished refurbishing the rear wheels. As well as fitting NOS hubs I had to contend with loose spokes on both wheels. After removing the old hub, and with the spokes still fitted to the rim I applied several coats of Chair - Loc to the area of the spokes that is covered by the hub and brake drum. Chair Loc was mentioned in great detail on the model T web site and works as follows - " Expands the grain and leaves a hard deposit inside the expanded grain of the timber". And to my amazement it worked!
I fitted the new hub with several layers of brass shim wrapped around the centre of the hub that contacts the end of the spokes. Another coat of Chair Loc, then fitted the brake drum. Where the spokes fit into the outer rim, several where loose, so I drilled a 9 mm hole into the spoke about 2 inches long and hammered in a 9.5mm dowel covered in Araldite. Resprayed a final coat of black on the hub outer face, and then a coat of Acrylic clear. The outer rim was still in its original coat of black from 3 years ago, and this also got the clear Acrylic top coat, which really brought the surface back up to a new appearance. The job was finished with a coat of clear to freshen up the spokes. Very happy with the finish. These were reproduction spokes from about 36 years ago that I have never been 100% happy with. Lets hope this time I have solved the problem.
The spokes are now as tight as a drum, and if hit with a hammer ( from behind of course) the sound is more metallic than wooden.
With the new hubs replacing the old worn ones I estimate i have increased the track between the rear wheels by approx 1/2 ".


2010 - April - Sloopy Gear Change
The gear stick had become sloppy and changes between gears were becoming difficult, to the point where I thought a clutch job was looming in the near future.
2. Weld and machine (or in my case file) the worn section of the key way in the gear stick ball to match the unworn section at the bottom of the ball. If the whole key way is worn then you require a clearance fit to the tower pins.(Will further reduce the side ways movement of the gear stick)
3. Weld and file back the tip of the stick to restore the tapered sides, with the finished size to suit the gates in your selector. See the picture below.( Reduces fore and aft movement of the stick, but more importantly ensures you are fully out of one gear before selecting another)
The picture below was sent to me by Ron from http://www.1928chevrolet.com/index.html and shows the same before and after results I achieved.

4. Check the assembled fit of the gear shift retaining cap, and being a bit loose, stretched the spring about 1/4 inch. (Firmed up the feel of the gear stick a bit more)
I tested the car after completing each of the 4 mods, and the results were amazing. At each stage the shift improved.
The changes are now smoother, more precise, and the stick feels a lot tighter through the changes.
It now feels like an old sports car change than a humble 28 Chev.
Previously I was missing some changes and the odd bit of grinding here and there, which I thought was my driving or an impending clutch overhaul. Not any more.
In summary 1st and reverse - No sideways movement, 2nd and 3rd half an inch each way, Neutral 1" each way. Previously I had a loose sloppy change in all gears and the stick would wobble and vibrate in all gears.
I can recommend to anyone who has not done similar or is running an un restored box, check the above 4 areas of your gearbox, you will not be disappointed with the end result.

Subscribe to:
Posts (Atom)