Around April 2009 I saw an advertisement for the 2009 Chev 4 Tour, a 6 day event to be run at Castlemaine, approximately 157 kilometers from Melbourne.
http://www.castlemaine.org/
This caught my eye immediately as I had not done any rallies for well over 20 years, and never a long event such as this.
The tour appealed to me as it was only for Chev 4's, produced between 1916 and 1928, and with an expected turn out of 30 cars, this would be a great chance to see a large number of similar cars to mine, not to mention the networking opportunities.
After a lot of deliberating and negotiation with my wife, and encouragement and support from my then employer Paul Grant from Baldwin Medical to attend, I made the move, signed up, and all is underway. Its now May, and the tour starts the 4th October through till the 9th.
I booked a cabin in the caravan park in the middle of town, and also went for a drive to Castlemaine in the modern car a few Sundays before the tour to get a lay of the land.
Nothing major needed to be done to the Chev, being less than 2 years since the wedding restoration, but I still found a lot to keep me busy, including a weeks leave prior to the event. Knowing that there would be a lot of Chev experts at the rally, it was a good time to get all those little jobs done that may detract from the overall appearance.
The biggest jobs were pulling out the radiator to replace my home made insert with an authentic reproduction, and repainting the bonnet sides after treating several areas of rust. Other jobs completed were repairing all 8 door hinges, replacing door rubbers, rehanging the doors, repainting all interior door posts, replacing all door post screws, polishing all door fittings and latches. As the body lines changed from rehanging the doors, I asked my friend Warren Hedges to replace some of the the pin striping. For the first time in many years the doors now closed a lot better.
There are probably a few more jobs that were done, but they have faded from memory.
The morning of the 3rd of October, the car was packed with spares, clothes and numerous other bits and pieces, washed, polished and put to bed ready to go in the morning.
Little did I know the following week would change my life and my opinion of the Chev.

Monday, May 30, 2011
2009 Bumpers at Last
I believe my Chev looks a lot smarter with bumpers than without, but before I tell the story, I will let you judge the difference, starting with the front:


For many years bumpers were just a dream. There were none available on the Australian market and the idea of making my own never appealed to me. Gradually the thought of bumpers faded away as a good idea that would never see the light of day. All that would change with the discovery of EBay.
While sourcing spares for the 2007 wedding restoration, I came across a front bumper on EBay, the first one I had ever seen as they are pretty rare, even in the states. Managed to be the successful bidder, but it cost me an arm and a leg. A few days later I purchased a rear set of bumpers, though not quite as expensive. The seller on EBay would not ship outside the USA, so after a few emails, Bill Chestwood from Billy Possum agreed to receive the bumpers in California and send the to me via FedEx. When they arrived I was disappointed that they were a lot rougher than I thought, so to this day they are tucked away in the garage, and I intend to restore them and try to recover some of the purchase price.
A few months later I purchased a good set of front bars, but it was getting too close to the wedding so I decided to shelve the idea of getting them fitted in time, and put them away, only to be joined by a very good rear set that I picked up the week after my daughter's wedding.
The bars gathered dust until early 2009 when I decided the time was right to fit them.
Lets start with the rear bars which I suspect had been re chromed by a hot rodder a few years earlier.
A lot of work was required to straighten the mounting brackets as they were severely bent out of shape, and welding repairs were done by a good friend, Geoff from Knoxfield Welding Services as 2 of the brackets were broken. The four bumper irons were also bent, but were a lot easier to bend back into shape. Several coats of primer and full gloss black acrylic enamel were required to bring the mounting brackets up to scratch, and a few coats of clear were applied to the bumper irons. Fitting was a nightmare as there was no point of reference as every thing had been bent. So it was numerous fitting and removing until I was satisfied the look was acceptable.
The front bar had its own set of dramas. The support bar was a 29, which sets a lot more out from the car. A lot of of cutting and welding was required to convert the support bar to suit a 28 Chev, and was also done by Geoff from Knoxfield Welding Services. I did not have the $600 plus to have the front bumper irons polished and plated, so I sprayed them both in full gloss acrylic black enamel and a good friend Warren Hedges applied two very chrome looking pin stripes. In years to come I may have them fully polished and chromed, but for now they are fine.
So after 24 years on the road, my Chev finally had bumper bars.
Sunday, May 29, 2011
2009 Change is in the Air
Early in the year I decided to respray the engine side of the cowl as the original black full gloss acrylic had faded and worn a bit in 34 years. I masked up the engine, cleaned down the "firewall", even though you would not really call it a firewall. After sprucing up the "firewall" I thought the engine looked a bit shabby, loosing paint here and there. So out comes the masking tape again, off comes all the bits and pieces of the engine, and I scrap, chip, and use what ever other methods I have at my disposal to remove the old coat of Dulux Oil based Green enamel that I painted the engine with in 1974. On goes a couple of coats of full gloss black enamel.
While the engine was being repainted I either plated or polished items such as:
Push Rod covers (plated in 1974, but never fitted until 2009)
Oil Filter canister
Dip Stick
Oil Filler Tube
Overflow Tank
Inlet Manifold
Coil
Coil Mounting bracket
All Rods and Linkages
All Under Bonnet Copper Tubing


While I had my head under the bonnet I also repainted the radiator cowl, the fan and the engine splash trays. During this under bonnet freshen up I would constantly think to myself that the quality of my original work back in the 1970's was a bit on the rough side. But at the same time I realized that I was now a lot more fussy, and would take the time to get it right.
Having now discovered poor mans chrome, (highly polish and spray on clear acrylic), I pulled out the steering column, tided up the ignition lock and switch, polished and clear coated the steering wheel metal frame, horn and hand controls. An unexpected improvement that came from stripping the steering column was the full length tubes that run from the steering wheel hand controls through to the steering box were binding up inside the steering column. A quick polish here and there, a couple of replacements from my spares, and for the first time I had, and still have (2011) smooth hand controls that no longer stick and jam up.

While the engine was being repainted I either plated or polished items such as:
Push Rod covers (plated in 1974, but never fitted until 2009)
Oil Filter canister
Dip Stick
Oil Filler Tube
Overflow Tank
Inlet Manifold
Coil
Coil Mounting bracket
All Rods and Linkages
All Under Bonnet Copper Tubing


Now finding myself on a roll I decided to tackle all the under bonnet linkages, such as the carby, throttle, advance and retard. All of these linkages were metal to metal and had always been sloppy, and were getting worse. Rose joints were fitted to the ends of all rods, and bronze bushes were fitted to housings where a rod ran through. Wow, what a difference, it was like a tune up. The carby was more responsive and the hand controls that previously required a lot of movement to take up the linkage slack, were smooth and gave an immediate response.
The dam thing was slowly becoming easier to drive.
Just to balance things out a bit there was a starting problem with the engine, that although I did not regard as serious, it was more of a nuisance. Cold starting was taking longer and longer and had been like that since shortly after the wedding in October 2007. I did all the usual things, checked the points, plugs with not much success. Replaced the battery earth strap which gave a stronger engine cranking, but the engine was still slow to cold start. Once warm it was never a problem, only cold.
Further investigations discovered that choke butterfly was not closing enough in relation to the degree the choke lever was pulled out. Adjusted the choke cable, which I had probably not refitted correctly after the engine face lift. Again there was a slight improvement, but the problem was still there.
After I rechecked the clearance of the carby float and found that was ok, I eliminated fuel as a cause, so it had to be spark and / or timing. There was plenty of spark so I ruled that out. Now timing had always been a bit of a mystery to me, but that was about to change.
So lets pull out the dizzy, give it a good clean and going over, and I will reset the timing as that was now the prime suspect. Being the first time the dizzy had been out in 35 years, the poor thing was probably desperate for a spit and polish anyway. Did the all the good things, stripped, cleaned, lubed, replaced points, insulator and rotor button. As I went to refit the dizzy, carefully using my scribed markings, I remembered that all the pictures I had of Chev engines showed the dizzy housing in a slightly different position to mine. So the timing was "right" according to where the rotor button was pointing, but the housing was not right. Had I moved the housing or taken the dizzy out years before? I could not remember. So I moved the housing around to where I thought it should be, hit the starter, nothing. Turned it a bit one way, nothing. Turned it a bit the other way, starts, but as rough as guts. So with the engine running I do my first ever and successful tune by ear. With a slight turn, can't remember which way, the engine is purring, well as much as a 28 Chev engine can that is. Kill the engine, inside for lunch while it cools down, and out again for the big test. Started then in 2 to 3 seconds and has done every time on a cold start since. And guess what, my dizzy now faces mecca in the same position as all the other Chevs I have engine shots of , and also matches the primitive repair manuals. So the problem of slow cold starting was a combination of the choke not opening enough, combined with the timing being too advanced.
Seeing I am talking about electrics, I installed a double battery arrangement back in the 80's, but forgot to mention it in earlier postings, so better late than never.I believe I did this to get a better and stronger engine cranking, and have been happy with it since.

2008 A New Year for a Reborn Chev
This was a pretty quiet year, and a mechanical break from the Chev, that the car and I both needed. There were weekly drives, a few trips to work and just a year to enjoy the new found reliability.
Apart from the normal grease and oil type servicing, no mechanical events to report, but still waiting for those bloody brakes to bed in, as this is still the car's weakest link.
Apart from the normal grease and oil type servicing, no mechanical events to report, but still waiting for those bloody brakes to bed in, as this is still the car's weakest link.
Chev Parts Dealers that assisted in the 2007 Restoration
Unfortunately there are not a great deal of Chev 4 parts available in Australia, and accordingly the following American dealers played a very important role of my 2007 wedding restoration.
All three were first class in service and backup, and provided plenty of verbal assistance also.
I have no hesitation in recommending all three.
Billy Possum.
C&P Automotive
http://www.billypossum.com/index.htm
Email Bill Chestwood at BJChestwood@aol.com
Gary Wallace
600 Susan Road
St. Louis, Missouri 63129
E-Mail
chev4cyl@charter.net
www.20schevyparts.com
The Filling Station
990 South Second Street
Lebanon, OR 97355
http://www.fillingstation.com/catalog.htm
All three were first class in service and backup, and provided plenty of verbal assistance also.
I have no hesitation in recommending all three.
Billy Possum.
C&P Automotive
1055 Hartzell Street
Pacific Palisades, CA 90272
http://www.billypossum.com/index.htm
Email Bill Chestwood at BJChestwood@aol.com
Gary Wallace
600 Susan Road
St. Louis, Missouri 63129
chev4cyl@charter.net
www.20schevyparts.com
The Filling Station
990 South Second Street
Lebanon, OR 97355
http://www.fillingstation.com/catalog.htm
2007 Part 5 Most Important Year for the Chev (On Reflection)
Well the wedding is over, the Chev is back home after staying at the reception centre for 2 nights on its own. Seems it had such a good time it did not want to come home in a hurry.
Into the garage it went, after all the make over was finished
You never really finish these things you know. There are always more jobs to be done. The next few years would see more improvements and repairs. Driving these further improvements was my belief that the older you get , the more fussy you get, the more attention to detail and in my case the more critical you become of the standard of work you did 30 odd years ago.
So its October 2007, I had just completed an 8 month restoration, and it was time to reflect on what I had achieved. It was hard work, a lot more than I thought it would be at the start. But I now had a much improved 1928 Chev compared to the one I started work on earlier in the year.
More important, hopefully it made the wedding day of Melanie and Justin just a little bit more special, and maybe the desire to achieve this was my driving passion throughout the project. Who knows.
I can not explain why, but I never had any doubt that the car would be finished in time for the wedding, but I must confess that 4am on the day of the wedding was just a bit too close.
I think you need to retain a positive attitude during restorations working to a deadline, otherwise it's too easy to make excuses and pull the pin. Sure there were times, and usually late at night, when I would have a reality check on how long the road ahead was, but you just keep going, baby steps.
Did I ever come close to pulling the pin. Cant really say as to me it was never an option once I started. But if there had been a trigger it could have easily been when I was stripping the rear end, and part after part was broken or worse. But a good nights sleep, and everything looked brighter in the morning. If the jobs started to back up and the days started to pass too quickly, I just increased the work rate, an extra hour here and there.
Would I do it again? No. I think you only have the ability and dedication to do this sort of job once. I would not take on an 8 month restoration involving so many tasks, especially after becoming aware of just what was involved. But a longer restoration, 12 months, 18 months or 2 years, well who knows?
In hindsight did I enjoy it? You bet I did, every minute.The Chev was back on the road, better than ever, and more important I was back The passion for playing around with an 80 year old car had returned, and is a strong as ever. (2011)
And my last comment of this 5 part posting is "a father made his little girl happy"
2007. Part 4 Most Important Year For The Chev. (The Wedding)
Nothing much happened today. Pretty quiet actually, a bit lay back. Oh yes, there was a wedding. The day went well, more importantly the Chev performed as expected, and a good time was had by all.
My daughter recently reminded me that after a child hood of being told not to touch the paint work of the Chev, during the wedding photos she was hesitant to do so without my ok. Also the photographer slid down the front fender when she was showing my daughter an example of a pose she wanted. Oops, must have forgot to tell her that I gave the car a once over with Mr Sheen the night before the wedding.
May I show you a few pictures from the most important and proudest day of my life since my daughter was born, her wedding day.


2007. Part 3 Most Important Year For The Chev. (The Restoration)
As interesting as I hope this posting will be to some, it may be just as boring to others, so I apologize for the amount of mechanical "stuff" and the degree of detail I feel needs to be conveyed to the reader. If you can handle it, stick with me, there's a hell of a lot of ground to cover. If not, well glaze over it, shake your head a few times and move on to the next posting.
In some ways this is the most significant posting since the first few covering the original restoration in 1973. Up until 2007 the car had always looked very smart, but mechanically apart from the rebuilt engine and transmission, was very average. I want to document the change into a car that can now be driven 200 plus kilometres in a day, with no problems, or a week long rally covering over 1000 kilometres with just topping up the oil and cleaning the plugs. Prior to the car being laid up in 1999, trips were always local, long distances were avoided and noise, vibration and "harshness" were plentiful.
To make it easier to recall all the events from memory I will lay out the restoration in the chronological order that I believed took place. There were many times due to availability of parts etc, that I was doing several jobs at the same time, but apart from not remembering anyway, I think it may confuse people.
Hey it confused me!
The following jobs were completed in the 8 months from February to the morning of the wedding in early October. The time spent was 4 to 5 nights a week, straight after dinner till midnight, 1pm to very late on Saturdays, and 9am till very late on Sundays. I could not have achieved this without the support and understanding of my wife Jan, and my employer at the time, Paul Grant from Baldwin Medical. We have since parted company, but Paul was a constant source of support, and tolerated my daily updates, and allowed me time off and long lunch breaks for the numerous trips for bits and pieces.
Jacking the car 3 feet off the Ground
I originally intended to cover this topic as a side issue, but being an important part of the process, I have dumped it right in the middle of the restoration. Also it may remind others not to under estimate the importance of safety in the workshop while working underneath cars. In previous years, working on several cars, I had survived 3 occasions where a car had fallen or slipped off the jacks while I was underneath. Knowing I was not a cat with 9 lives, the 2007 Chev Restoration was always going to be "Jack Safe"
Some people have secondary back up, I had triple. There were jack stands positioned to take the load if the car slipped on the main jack stands, and modern tyres and wheels on their side to stop the car hitting the ground if the worse happened. With the Chev being a heavy car, perched 3 feet in the air with no front or rear axle for approximately 4 months, I was never going to take any short cuts.
We are talking about 3 sets of heavy duty truck type jack stands, 4 modern car wheels and tyres, and several purpose built support stands. That baby was not going any where, and even then every day before I went underneath the car I went through a check of all the jacks in all the places, just to make sure.
If I ever did a restoration like this again or had my time again, I would remove the engine and transmission, then with no front and rear axle or hood, make up a rotisserie, and rotate the bugger.
Hood
Originally I had not planned on removing the hood, but after I discovered the poor condition of the hood irons, there was no argument. It was "Off with its Hood". I had made contact with Grant White, who specializes in Vintage Upholstery, and had arranged that he would refit the hood sometime around September. Needing a place to store the complete hood and hood bows, the pool table in the family room became the obvious choice. Well at least for me, not quite sure about how my wife Jan felt about it. Removing the hood greatly assisted the restoration process, as I was able to jack the car 3 feet off the ground without worrying about hitting the garage roof.
Rear Axle Housing
I decided to strip the axle housing back to bare metal as there were several areas that required welding repairs. This turned out to be a big task as there were several layers of black enamel,
several layers of zinc chromate, a layer of dirt, rust and then at last metal. Thank god for high speed heavy duty wire brushes and angle grinders. If I struggle to recall back in 1973, my only tools were a wire brush wheel on a Black and Decker drill, and rotary sanding discs. But what about the rust, did I not do a proper job back then. To be honest I can not remember, and why did I not have it sandblasted in 1973?
There were four problems with the housing, and were mainly due to me using a unit from a paddock bomb back in 1973, and not being fully aware of the poor condition it was in.
The first problem was the contact area where the axle saddles (which attach to the spring) rotate on the housing. On both sides there was sufficient wear marks to convince me to have the low spots filled with weld and ground back to an even surface.
The second problem was on one side where the axle saddle sits on the housing. There is a curved section of approx 1/4" thick metal riveted to the housing, which the saddle locates and rotates on.
ground the weld back to a smooth finish.
All welding repairs were done by a good friend Geoff from Knoxfield Welding Services, whose skill and attention to detail was a great assistance during this critical part of the restoration.
The fourth problem started as a minor job and turned into a marathon. I noticed there was significant rust inside the axle housing, at the top. I found this very strange as you would think that the oil churned up inside the axle and diff would splash and coat all internal surfaces with a coating of oil. How long it had been there? Don't know, could have been before it was restored in 1973 or later, but I cant be sure.
Got right into cleaning the rust out with a heavy duty circular brush on an extension rod on a power drill. Cleaned up the inside areas where the axle shafts are located, and set to work on the diff housing. Next problem. Inside the diff housing, is a complete inner layer or steel ring. This appears to be for two reasons. Firstly to provide extra strength for the diff housing and extra thread material for the diff bolts that hold the cover on one side and the torque tube on the other. Using long telescopic lights I found heavy rusting running underneath this inner layer, and the only logical solution was to remove it. This would not be easy as this inner layer appeared to have been inserted before the axle housing had been pressed and formed into a complete unit.
So its out with the Dremmel and countless mini cutting disks. About 5 hours later on a Sunday afternoon I managed to cut the inner layer into several sections and removed it. Next time if there was a next time, think I might go for chemical dipping. My hard work was rewarded by locating and eradicating a deep seated layer of rust that covered the entire inside surface of the diff housing between the inner and outer layer.
Where did this rust come from?
How long had it been there?
How can metal under oil rust?
Has there been water in the diff at some stage?
Never really found an answer and other Chev owners I have spoken to where none the wiser.The job was done, everything went back together all ok, and this axle housing will never rust again, I hope.
Torque Tube
This presented a simple problem with an involved solution. There had always been excessive slop between the torque tube and where it slides into the uni joint bell. I had been aware of it for a few years, and had been avoiding it. With the rear end was out of the car, it was time to fix it. The job required the torque tube being mounted in a big lathe, and the area of the torque tube that fits inside the uni joint bell, being turned down minimally, but just enough to achieve a constant diameter over the entire area. The end result combined with a new section being made and welded to the uni joint bell was perfect. The job was finished with the rear of the bell machined to fit a modern oil seal. Many thanks to "Geoff the Machinist"for a job well done.
Tail Shaft
No this is where the restoration gets a bit lumpy, and the reason why the car was up on jack stands for many months. As I mentioned previously the tail shaft was cracked where the pinion fits, and was unserviceable. I had 5 spare shafts, but they were all in poor condition, and could not be used. I had been told about several companies in the States who were making reproduction mechanical parts for early model Chevs, and after searching the net, I came across Billy Possum. Rather than me try to explain the wonderful story of Billy Possum, let me list their email address below. Its great reading.
http://www.billypossum.com/index.htm
Emails went back and forth to Bill Chestwood at BJChestwood@aol.com and I found that all the parts I needed for the drive line reconditioning were available ex stock, except for the most important item, a Tail Shaft. Bill advised that tail shafts were currently out of stock, with no production run planned for several months. This was a set back, but pushing this to one side I arranged with Bill to ship the following parts, by FedEx, costing a small fortune. About 2 weeks later, after many more emails, and arranging international money transfers, the package finally arrived containing the following parts:
2 x Rear Axle Bearing Retainer
2 x Rear Axle Keys
2 x Rear Axle Inner Seals
2 x Rear Axles
1 x Propeller Shaft Installation Kit
1 x Propeller Shaft Bushing
1 x Propeller Shaft Packing
2 x Front Brake Cam Lever Adjusting Nut and Collar
2 x Carter Carby Bowl Gasket 23A-14
I can not recommend highly enough the great service I received from Bill. The prompt turn around in processing my order, and the quality of the parts supplied can only be described as first class.
But I still had no tail shaft, nothing was available reproduction ex stock from the States, and time was ticking away. In desperation I looked up a dealer that I knew from back in the 1970's. A guy called Tony Noonan from Obsolete Auto Parts in NSW. I emailed Tony who was not well at the time and took several weeks before he was well enough to check his stock and get back to me if he had a tail shaft or not. The good news came through that he had located a tail shaft, and after several emails, bank transfers and arranging TNT to pick up, I finally received the tail shaft and a few other items in the second week of May.
A bit of a scare when the tail shaft finally arrived. Nice heavy coating of rust, but after several hours of cleaning and polishing, all was well, we are in business.
So its mid May, the car is on jack stands with no front or rear end. The rear axle and diff are spread across the garage floor, in various stages of repair. I was so pleased to finally have a tail shaft that it over shadowed any feelings and or concerns that I may have been running out of time. After all, its May, plenty of time till October?
Re-Assembling the Rear Axle and Torque Tube
With the tail shaft arrived the assembly process commenced, in the following order:
1. New bearings were fitted to the tail shaft
2. A good second hand pinion was fitted to the tail shaft
3. A new bushing was fitted to the torque tube.
4. The tail shaft was fitted to the torque tube.
5. New bearings were fitted to the diff carrier.
6. A good second hand crown wheel was fitted
7. The diff assembly was fitted into the torque tube
8. The torque tube was bolted to the axle housing
9. New bearings and retainers were fitted to the axle shafts
10. New seals were fitted to the axle housing
11. The axle shafts were fitted to the axle housing.
12. The back cover was fitted to the axle housing
13. Job finished, at last
Hood Irons
The Hood Irons were pretty sad, especially the "Horns", which is where the timber bows fit into. I contacted Richard Walton in Eastwood, NSW, who advertises in Restored Cars magazine. I had peace of mind straight away. We worked back from the wedding date in October, and settled on Richard having the repaired Hood Irons back to me by June, July at the latest. I knew the job was beyond me, so I told Richard to do what he had to, and we agreed on a maximum worst case cost. When the Irons came back on time, I was very pleased with the quality of the work, and also the cost was cheaper than anticipated. The repaired Hood Irons looked brand new, and in 2011 still do. With several coats of acrylic primer and acrylic full gloss black enamel, they were ready to go.
Front Axle
The front axle received the following treatment:
1. Stripped back to bare metal
2. Checked for straightness
3. Primed and painted in black full gloss acrylic.
4. Brake arm pivot points were re bushed.
5. New King Pins and bushes were fitted
6. U bolts were cleaned,. re threaded and plated in Gold Zinc
7. Stub Axles were checked, and replaced with more serviceable units
8. Brake backing plates were cleaned, zinc plated, primed and painted in black full gloss acrylic.
9. All nut and bolts were either replaced or zinc plated.
10. All Grease nipples were replaced
Steering
All grease nipples were replaced
Tie Rod
Stripped back to bare metal
Checked for straightness
Re threaded
Primed and painted in black full gloss acrylic.
Tie rod ends were replaced with later model Chev sealed units.
Drag link
All balls were replaced with new units
Pitman Arm
Replaced with a more serviceable unit
Ball replaced with a new unit.
Under body
Cleaned
Wire Brushed
Painted in Black Full gloss acrylic.
Front and Rear Springs
Stripped to individual leaves
Sanded to remove rust
Primed and painted in Black full gloss acrylic.
Bushes were all replaced
Re-assembled with new bolts
If it doesn't Move Plate it
I liked the look and corrosion inhibiting benefits of either Gold or Blue Zinc plating, so I went crazy and plated the following parts:
U Bolts
Spring shackles and Bolts
All under body Nuts and Bolts
Brake rods and Fittings
Front and Rear Brake Drums
Radiator / Cooling System
I did a rough fit with the radiator as I suspected a small leak. Well actually there was a small leak when I packed the car away in 1999, so one would presume it was still there. I was not disappointed!
No time to muck around, so I pulled it out, stripped the core from the housing and took it down to the local Radiator shop who also did rods and vintage cars. I did not get a very positive reaction. There were concerns about how thin the top and bottom tanks may be on a 79 year old radiator, and if they would survive the de-soldering and re-soldering process. Both tanks needed to be removed to gain access to both ends of the core to clean it out and try to fix the leak.
I left it with him for a week, and another week, and again. Finally got the call to come over and see him as there was a problem. He could not get into the part of the core where the leak was, without destroying the frontal appearance of the core. The leak had been reduced to a seepage but it was still there. There was one other thing he could try, failing this its a new core. Ouch. The core is immersed into a tank of solution containing a high level of metallic particles. While submerged the solution is pumped through the core at low pressure, and hopefully the metallic particles are attracted to the hole and plug it. Did it work, bloody oath it did, and has never leaked since (2007 to 2011).
The engine block was sealed top and bottom and filled with undiluted rust cleaner / converter, and allowed to stand for 6 hours. The engine block was then flushed out with high pressure water. The end result was that no signs of rust remained, and the block was cleared of any obstructions.
The water pump was cleaned repacked with grease and refitted.
The thermostat housing was replaced with a more serviceable unit.
Engine
The engine was relatively left untouched during this pre wedding restoration and would enjoy its own dedicated cosmetic revamp in 2008. Items such as plugs, points, oil, oil filter, rotor cap and button were replaced as part of a routine service. I must again sing the praises of George Russell who reconditioned my short engine back in the 70's. It has always been strong and continues to do so. It may moan and groan now and then, and have various noises at different times, but there's still a few years good motoring left in it. (2011)
Engine Bay
Similar to the engine, not much attention was payed to this area, and would happen in 2008. The only work done was to tidy up the engine bay wiring and repair the chassis cross member under the radiator.
Transmission
Untouched
The Uni Joint
A new replacement was fitted
The Fuel Tank and Vacuum Tank
Both enjoyed a four stage process to eliminate what little rust was present, and to ensure they would remain in first class condition for many years to come.
The product I used was POR Fuel Tank repair kit
http://ppcco.com.au/kits3.htm
Over a period of 2 weeks the POR kit enabled me to restore the tank to as new condition, and by following the instructions to the letter, the tank was thoroughly cleaned, rust treated, etch primed and sealed with a smooth ceramic type lining. I also treated the Vacuum Tank the same process. That was back in 2007, and so far (2011), I have every expectation that both items will last for many years.
The Brakes
Relined all wheels
All linkages inside brake drums replaced
Brake rods were re bushed
Replaced front brake cam adjusters
The Exhaust System
Fully Polished
Hot Air Intake re welded
Replaced exhaust straps and hangers
Wooden Spoke Wheels
Stripped
Rims sanded back to bare metal, primed and painted full gloss black acrylic
Spokes sanded and filled
Re-assembled
Stained and lacquered spokes
Primed and painted wheel rims in full gloss acrylic enamel.
Tyre Rims
Sandblasted
Blue zinc Plated
Painted Silver
Tyres, Tubes and Rust bands
Purchased full set for 5 wheels from Antique Tyre Supplies
Windscreen
Replaced Top glass section
Sanded, filled and painted surround in full gloss back acrylic enamel
To the Upholsterer
It was early August when the Chev was loaded on a trailer for the trip across town to Grant White Motor Trimming in Rosanna. The drive was done during peak hour, and the Chev looked very prominent on the trailer, facing the rear, with no hood. I arrive at Grant's place and would have been concerned with the steep and narrow drive if I had not seen it a few weeks prior. The Chev is driven off the trailer and up the street to turn around. Very slowly mind you as there was no oil in the diff, and the brakes, well lets not talk about that as they had only been connected the night before. Managed to get the beast up the drive and into the workshop with no drama, except the butterflies in my stomach.Never had any thing less than full confidence in the work that Grant would be doing and I had arranged for the following jobs to be done:
1.Refit Hood Irons
2. Refit Hood Bows
3. Refit Hood
4. Replacement perspex in the rear window
5. Replace clear plastic in side curtains
6. Replace carpets front and rear
Picked up the car about a week later, what an improvement. The hood was looking more "tight" than it had for many years. The side curtain windows were clear instead of yellow. The new carpets looked great, and Grant also installed a vinyl scuff pad under the pedals and had made carpet mats for front and rear with left over material. I have seen many examples of Grant's work and have no hesitation in recommending him.
Its a Blur
I have limited recall of the work that was done between the Upholstery and the Roadworthy, but I am sure it was a mad rush as I was still working all the hours I could. I expect there was a lot of time spent trying to get the brakes working, sort of, just a bit, forget it. And its probably around the time I worked on the lights, switches, fuses, and connections which had not yet awoken from the 8 year sleep when the car was laid up.
Roadworthy
The Roadworthy on the 16th September 2007 went ok. A quick chat, walk around the car, up on the hoist, check a few things, test drive, ask me a few questions, check a few more things, fill out the paper, pay the money, on my way.
Registration
I had a permit and was able to drive the car around for testing purposes. On the 18th September 2007 the car was driven to Vic Roads for the registration process. I had to stop every few minutes on the way to adjust the brakes, that were very hot and smelly. Spent 5 minutes under car outside Vic Roads prior to appointment wiping any trace of oil. Because as we all know 1928 Chevs don't drop oil?
The registration process was certainly different from the first time. You have to make an appointment these days. My number was called up and I saw a young bloke who was very pleasant, and pretty interested as it was the oldest car he had registered. We did the paperwork and went outside to inspect the Chev. No problems, back inside. I was able to get the registration number that I reserved back in 1999. But it cost me an extra $90.
All done registered, road legal, insured and put to bed. The only problem was the brakes were still pretty average and would remain that way till April 2011, but that's another story.
Pin Striping the Body
Two weeks before the wedding my good friend and bike riding partner, Warren Hedges, a very skilled sign writer, did the pin striping. Four years later (2011) I still get positive comments about how good it looks. And of course the completed pin stripping required testing and inspection by Warren's clan, as per the following photos. To highlight how few miles the Chev had done at this time, in the photos below you can still see the remains of the labels on the front tyres:


The Running Boards and The Week Before The Wedding
I arrived home after having the pin stripping done by Warren. My wife and daughter joined me to look over the car. I mentioned that it was a shame that I was running out of time to do a few finishing touches, such as fit a new set of running boards that I had purchased and originally planned to have fitted for the wedding. The more we talked, and I looked at the original running boards, they stood out, looking very sad and needing to be replaced. They were slightly bent, and the rubber matting was perished. Clearly there was no option as they were detracting from the appearance of the car.
So with a week and 6 days before the wedding I pulled off the running boards. This was not a simple process as I had to take care not to scratch the valances, front and rear guards. I believe it took me from Sunday till the following Friday, by the time I primed, sprayed, and fitted the running boards. And it was probably around his time I was starting to feel a bit tired from the whole restoration process. I still had to glue on the new running board rubber matting, but I had other plans.
Melanie and I had arranged to see Phantom of the Opera a few months earlier, and this turned out to be on her last Saturday as a single girl. It was a great afternoon together for Father and Daughter, and a welcome break for me from the Chev.
After all, it was Saturday, and I still had a week before the wedding, with the bonus of being on leave for the next week. I decided I would do the gluing on the last couple of days prior to the wedding as I still had several other jobs still to be done. Don't ask me where that week went, but there were jobs here and there that just soaked up the hours, even working all day. Thursday morning came around, and I set up to glue on the rubber matting, the final restoration job prior to washing polishing. Finished the job by mid afternoon and went for a Thursday night bike ride with my friend Warren, the first in a few months as I had cancelled them to devote more time to the Chev.
Arrived home around 10pm, and thought I would check the running boards before I went to bed. Disaster, as the matting had reacted with the contact glue, and strecthed out of shape so much it could not be salvaged. Luckily I had a spare set of mats, but that was the least of my problems.
I spent most of the Friday cleaning off the old contact glue, sanding, priming and repainting the areas of the running board metal surface that would be seen. While I waited for the Acrylic paint to cure I did the cut and polish as time was running out big time. We are now talking about 4pm the day before the wedding. The car had to be ready to drive to the chapel by 8am the next morning.
Very carefully glued on the running board rubber mats, and made sure there was minimal glue and no tension that would cause the rubber to stretch. Luckily fate was on my side and they both dried in perfect condition. Touched up the black acrylic here and there, put in the last few bolts, and declared the car mechanically finished.
But it was now around midnight, and I still had to wash off the cut and polish residue, clean the hood, vacuum the interior, refit the carpets and black the tyres.
I remember my wife coming out about 2am to check on how things were going, and shortly afterwards we decorated the interior with a garland of flowers, which was to be a surprise for Melanie.
A few more things to do, things to check, and finally turn out the lights and climb into bed at 4am. Its all over, I have done as much as I can, and if it's not done its too late.
The wedding is about 10 hours away.
Wednesday, May 25, 2011
2007. Part 2 Most Important Year For The Chev. (The Realisation)
Let me set the scene. Its a Friday afternoon, early February 2007. The Chev has been laid up, off the road for 8 years and my daughter has asked for it to be used for her wedding car in October 2007.
Here we go.I finished work at 1pm, put down a quick lunch, changed into the overalls, and into it. The first thing was to get the engine running. I throw in 2 new batteries, pull out the plugs, squirt a bit of oil in the bores, turn the engine over a few times with no plugs, fill up the petrol tank, pump up the perished tyres, press the starter, engine turns over and hey presto, nothing. Pull the choke fully out, pump the gas pedal a few times, hit the starter again, still nothing.
Like all simple engines from years ago there are only 2 reasons why they won't start, fuel and spark. Checked the dizzy, spark there, checked the plugs, spark there, then checked the carby, oops, dry as a bone. What did I know about petrol crystallizing. Nothing, but I was about to learn. Pulled the bowl of the carby, lots of white powdery crystals, not a good look. Cleaned out the bowl, needle and seat and inlet filter, re-assembled, hit the starter, engine fired, rough as guts and would not idle, generally not a happy camper.
Pulled the carby off and stripped it down. All jets and everything else covered and blocked with the same powdery crystals. Cleaned everything, re-assembled, refitted carby, hit the starter, engine fired and ran like a top, well sort of?
Good, that jobs done, next.
It was at that moment, within several hours of picking up the first tool to work on the Chev in about 8 years, I was back, the passion had returned. I had a date. I had a deadline. I had a challenge. I'm Back. Should I strip down the vac tank, no, its working, leave well enough alone.
I am on a roll
What's next. The radiator has a leak, worry about that later, lets do the other big jobs first. Checked around the rear wheels. Not happy. Oil was seeping from the rear axle onto the brake linings. I was about to learn another valuable lesson in maintaining a 28 Chev. I was unaware that oil can run from the gearbox, through the uni joint, down the torque tube and overflow the diff and back axle.
I removed the fill plug from the diff cover, and instead of putting oil in, it came out, about a litre of the stuff.
Still feeling pretty positive, even though I knew the rear brakes were shot, pressed on regardless. Stripped off the rear linings and soaked them in petrol to see if they could be salvaged. No way, they were full of oil. No matter how much I brushed, oil kept bleeding to the surface. Still, not a major set back as the brakes were always pretty average anyway, so a brake job was not the end of the world.
After all, its February, plenty of time till October. Famous last words, maybe.
Little did I know that things were about to take a turn for the worse.
It was then that I also noticed oil around the springs, which I thought was coming from the linings, must remember to check that out later.
What happened next was the most significant decision I made during the whole pre-wedding preparation, and had I not followed the path I did, the wedding day for the Chev may well have ended up on the back of a tow truck, or even worse.
Although not completely convinced it was required, I felt the best course of action was to remove the complete rear end, including springs and torque tube. If nothing else this would give me access for a good clean up and paint job. There was also a bit of wear on the top of the torque tube, where it fits into the universal joint housing, and this would be a good opportunity for a bit of repair and maintenance.
The Chev is put on jack stands, and unbeknown to me, would remain on them, without wheels until late July. If I had known this at the time would I have panicked, got cold feet, advised Melanie and Justin to make back up arrangements. You bet I would have.
Still feeling reasonably calm about proceedings so far, the rear end is lifted onto stands so that I can remove the axles, replace the wheel bearings and seals. Off comes the wheels and the first area of concern was the key ways on the rear axles, they're about twice the size of what they should be. Not happy as I know the job is getting bigger by the moment. I removed the diff to inspect the crown wheel and pinion. Give the diff a bit of a spin by hand, something was not right, there was a clunking noise every half turn.
After all how bad could it be. The car was still running when I put it away in 1999.
That turn for the worse was getting bigger. The crown wheel was loose as the 12 or so rivets securing it to the carrier were about half way sheared off. This means that for some time, or maybe even years, the crown wheel had been sliding back and forward each time I changed gear from 1st to reverse.
My pride and joy was not in very good condition, and to be more precise was unsafe. Could you imagine what may have happened if the crown wheel came adrift at 35mph, and I am talking safety as well as mechanical.
I removed the diff from the housing, and separated the torque tube so I could have it repaired. The machinist said he could repair the torque tube by machining it back to a uniform diameter, and there was no drama in taking metal off the torque tube as he was making up a new uni joint bell as well. The only requirement was that he wanted me to remove the tail shaft, which I thought was a pain, but it had to be done.
After all, how much more drama could come my way, things must start looking up soon.
Nuh no way.
As I removed the tail shaft it looked ok, the pinion looked good, but just to be sure thought I would remove the pinion from the tail shaft. Found what I thought was a deep scratch on the tail shaft, three quarters of the way around the entire circumference.
That's no scratch its a bloody crack.
With the feeling that this was becoming as loosing battle I dropped my bundle. It was the lowest point I had ever been to in the 34 year history of the car, and the most distraught I had been about the condition of the car, and my ability to fix it. I had no idea what was the best course of action.
What do I do now?
Are spares available?
Have I got enough time?
Do I tell the kids I can't make it?
All of a sudden the words "Its February, and I had plenty of time till October" were starting to cause a bit of a panic.
Yes it was lowest point in my time with the Chev, but it was going to get better, much better
And anyway it was February, and I had plenty of time till October, I hope.
2007. Part 1 Most Important Year For The Chev. (The Event & The Plan)
It's February 2007, I am several weeks into a new job, and the Chev is the last thing on my mind.
Boy was that about to change.
First things first, let me tell you how 2007 became a very important year to me, and a new lease of life for the Chev that had been off the road for 8 years
My daughter Melanie and her partner Justin announced their engagement in 2006 and were to be married in October 2007. I cant remember the exact date they asked me to have the Chev as a wedding car, but there was no doubt that I would answer in any other way than yes. How proud I was that my little girl wanted the Chev to convey her on the most important day of her life so far.
Melanie and Justin started making wedding plans, so I thought I had better make a plan for the Chev, and it was so simple. There was no plan. I thought it would be a quick mechanical once over. New plugs and points, change the oil, replace the battery and tyres, a cut and polish and away we go. Seemed pretty simple, so its January 2007 and I am thinking plenty of time before the wedding in October, no drama. I will start in February, finish it in a month or so at a leisurely pace. Even allowed myself a few weeks to clean up the garage, get my tools in order and generally get myself into gear.
So I am preparing myself and my garage, which at the time was a mess, for what I thought was a pretty simple dust off and tune up. Just as well I never used to be a weather watcher in those days, as I am sure there were storm clouds gathering.
Wednesday, May 18, 2011
The Dark Days Will Last from 1999 to 2007
What's happened?
Where is he?
If the Chev had feelings these thoughts would have been going through its mind.
Sometime around Xmas 1998, the Chev fell out of favour, and was parked in the garage for a long long time. Early in its solitary confinement, a further blow was struck when I decided I could no longer justify the yearly registration. I was not driving it much and had lost the passion. Up until this time, from 1975 to 1999 the Chev had always been on full registration. I had never been and still are not a fan of limited or club registration. I believe that many abuse limited registration and it will only take a small crash for someone to be in real trouble, compared with the price of full registration.
I kept the insurance but modified it to "laid up" coverage, meaning everything is covered except driving on the road.
Luckily I rang Vic Roads to notify them the car was being laid up, rather than just not paying the renewal. Turned out to be a good move as the operator informed me that I could still retain the registration number, but I would be responsible if it was detected on the road during that time. Seemed like a good deal, and the registration number was reserved in my name.
That was it, the lights went out, no more late nights in the garage, the garage door only opened to get the lawn mower out or do a non car related job in the garage. To make it worse I took on another restoration, a VB Commodore for my son Ross. Poor old Chev parked or pushed outside while it was still mobile, having to watch all that attention being given to another car.
Time went on, the Commodore was finished and the Chev was back in solitary. A year passed, then another. I would occasionally start the engine, warm it up, and turn it off. This went on until the batteries died and that was it.
Time rolled on, 2001, 2002, 2003, 2004, 2005, 2006.
Nothing, no sign of life, no activity, nothing.
As I remember in the end the poor old thing was covered in dust, full of rubbish, and possibly at a cross road.
Roll on 2007
Monday, May 16, 2011
Seven Weddings
Over the years I have been happy to do weddings. Apart from 3 paying jobs, they were all family or friends, which I enjoyed a lot more than strangers. The 3 non family or friend weddings came about in the strangest way. The Chev has been involved in 7 weddings and 6 are covered in this posting. The 7th was the wedding of Melanie (my daughter) and Justin, and is covered in " 2007, one of the most important years for the Chev and I"
Wedding no 1 (Approx 1979)
My first wedding was for Rick (a guy that I worked with at Novalit in Cheltenham) and Margaret. Being the first time the Chev had a ribbon on its bonnet for a friend, it was a special occasion for both the car and its owner. I picked up the bride to be and her father from some where in the Chelsea area and we motored to a nearby church. Little did I know that a rumbling, grinding noise from under the car, would manifest its self in a year or so as a very difficult problem to overcome.
Anyway, apart from the noise, which was coming and going, the trip to the church went well, and then we drove to the reception at the Sandringham Football Ground, via a photo session at a local park.
Wedding no 2 (Approx 1987)
I received a call one day from someone who had been given my name by a friend, and asked me to use the Chev as a bridal car to take both her and her father to the church. She never told me who passed on my name, and after her father paid the money, cant remember how much, I didn't bother to ask her again.
The deal was I picked her up from somewhere in Boronia, accompanied by her father, and drive to the church in Underwood Road near the Toyota dealer in Fern Tree Gully.
There was no crowd outside to greet us, and I was not required to wait and take the Bride and Groom anywhere else.
I watched the Bride and her Father walk into the church, the only indication that a ceremony was to take place???
In hindsight I think the trip in the Chev was a gesture to her elderly father, who I remember was more nervous then his daughter.
Strange, very strange you may say, but I was paid, so I drove home packed up the ribbon and that was that.
Wedding no 3 (Approx 1989)
It was a Saturday, and the wedding was over the other side of town, Essendon or some where over that way. I won't even try to tell you about the wedding, but lets just say that Vintage cars and a traditional Lebanese wedding don't really go together. But hey, I made $100 bucks for day and got a free feed out of it. Time to leave as the boys outside were getting a little bit out of hand, and they were too close to the car for my liking
Wedding no 4 (1992)
Preparations - Or how I broke my thumb in 3 places and nearly got shot by the police on the same night
The occasion was the upcoming wedding for Franca and Nigel, who both worked with me at Stem Industries.
I had embarked upon a mini restoration on the brake rods and linkages, prompted by the upcoming event, and I made good use of the after hours access to the workshop at Stem. In fact you could say on one Friday night I pushed my luck a bit too far, in possibly two directions.
The first thing happened when I was cleaning up the rear axle brake rods that operated the internal hand brake linings. As I recall the rods were not polished up enough for my satisfaction, so I thought I would spin them in the lathe while holding a piece of emery cloth against the rod.
The lesson I learned was when you are spinning a shaft on a lathe whilst holding emery cloth against it, you never hold both ends of the emery strip between the same fingers as the emery can grip and drag your fingers in under the spinning shaft, which it did, OUCH.
Not realizing the extent of my injury, which the Doctor confirmed 2 days later as three breaks in my thumb, between the tip and the first knuckle, I kept working for several hours, wondering why my hand was tingling and turning red and blue.
Any way, job done, its midnight, time to pack up and go home. Seemed like a good idea, except for one little thing.
I was busy loading all my tools into the open boot of my car, and like many times before the Security Service would drive in through the open gates, recognize my car, a flash of the headlights and then take off. Seems very simple, don't you think.
There was one little difference that Friday night, and it went like this. Ray is loading tools into the boot of his car around midnight, car pulls into driveway, flashes headlights, Ray waves, and Blue lights flash on for about 5 seconds.
Now Ray is a pretty smart fella, so he realizes its a Police car, not the security service. Ray waves again, blue lights on again with flashing headlights this time. Obviously he was trying to get my attention. Thinking I had nothing to hid as I was a Manager of this company, in a company car, with company keys, and authorised to be on site after hours.
Whats the sensible thing to do? Simple, walk the 50 metres to the Police car and reassure the constable that I am a law biding citizen, who appreciates him taking the time to drive through the open gate and check out a person loading tools into a car boot.
The policeman was so impressed by my greeting, all he could say was "If you ever walk up to a police car like that again with a weapon in your hand, you will be shot"
Now he has my 100% attention.
The whole time he was talking from inside the car, he was in darkness, with only his hands visible.
The next 10 minutes were spent on small talk.
Who are you?
Where do you live?
What are you doing here?
Tell me your rego number?
Hand me your licence.
All ended well. He advised me in future to have the gates locked if I was working after hours in the dark. This was a practise I religiously followed from then on.
While driving home, I had this thought that my throbbing finger may be dislocated, so what do you do when your driving, simple, you pull very hard on your possibly dislocated thumb to put it back into place.
WRONG, the lights start to go out, the radio goes blurry, and Ray feels very sick, and the oncoming cars start to move from side to side.
Hm, not dislocated after all.
The next month or so spent preparing the car for the wedding with a broken thumb was certainly a challenge, but I got there in the end.
Basic things like hammering, screwing, using pliers etc, all were very difficult.
The WeddingI picked up Franca on a Saturday morning from her parents house in Scoresby, and we then proceeded to St Joesphs Church in Boronia. I can't remember much about the day. The ceremony and reception both went well, and a good time was had by all.
The Chev parked outside the church

Wedding no 5 (Approx 1998)
Driving home one night from Oxford Medical, where I was working at the time, I noticed there was a lady in a Volvo following me.
What had I done to upset the driver who followed me from Bayswater, through Boronia into the Basin, into my street and parked out the front as I pulled up in the driveway.
Before I could even ask the what was going on, she said I want your car for my wedding in 3 months, how much will you charge.
Not really wanting to do a wedding at that particular time of my life, as I was still establishing myself in a new job, I asked for double what it was worth, hoping it would scare her off.
To my surprise she said ok, opened up her purse, gave me the money in cash, got my phone number, said she would call me in a few weeks, hopped into the Volvo and drove off.
Well, she did ring me, the wedding went ahead. I suspect it was another gesture from a daughter to her father, as again they were the only people that rode in the car to the church.
The journey involved picking up the bride and her father in Mooroolbark, and taking an exceptionally long route to the church in Lilydale, under instructions from her father, who had a 28 Chev in his younger days.
Again there was no requirement for the Chev to participate in any activities other than a conveyance from home to the church, no crowds, no photos.
Who am I to wonder and come up with an explanation, I took the money, did the job, and that was that.
Another Wedding, number 6, will take place in 9 years that will change the Chev for ever more, but more about that later.
Wedding no 7 (December 2007)
This was the wedding of Gary (my nephew) and Alex. They could not have chosen a better day, but it was a bit hot.
The ceremony took place in a park in Vermont, near where Gary's parents Colin and Leanne were living at the time.
I picked up Alex from Gary's parents house and travelled the short distance to the park.
The Chev then watched the proceedings from the street and then welcomed the happy couple back into the car for the trip to another park for a photo session, followed by transporting the newly weds to Gary's parents house for the celebrations that continued well into the night.
Always a bit special when you do such an event for family.
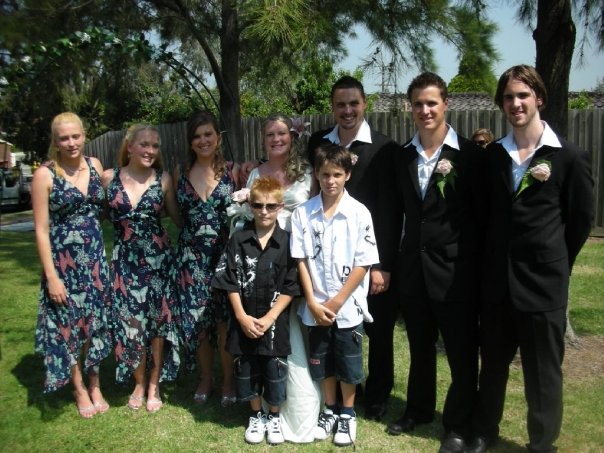


Subscribe to:
Posts (Atom)