The purpose of this Blog

This blog is to detail my 50 years (1973 - 2023) with a 1928 Chevrolet tourer, affectionately called "The Red Chev".

The acquisition, restoration, improvements and my experiences over the years are covered in as much detail as I can remember.

Some of the later postings include car club outings and other vintage car items that I hope will be of interest to people.

If you have the time, scroll back to where it all began in 1973 and follow the journey so far.

Thanks for dropping by.

Regards Ray Dean


See my new section "The Red Chev - Repairs, Improvements, Maintenance and Technical Details" located on the left hand side of the screen.


Pages

Tuesday, June 30, 2015

Day 21 - 28 Chev Ute Restoration (30th June 2015)

Good progress today in two ways. The first improvement was wheels on the rotisserie to make it easy to move the chassis around and store it in the garage overnight.

The second and more important was the ongoing chassis clean up.

So far both rails look pretty good, the bottom edge on the passenger side has a section between the transmission mounts and the handbrake linkage cross member about 15 inches long that's a bit on the thin side. This will be cut out and a new piece welded in.

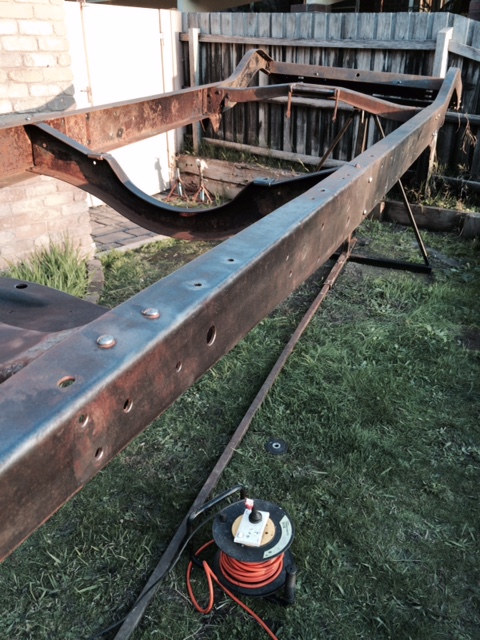
I did not like the look of the rear cross member where it joins the chassis, so I removed it to get at the rust and will replace it with a better one from the original chassis.

The front cross member has at least 4 loose rivets, so I will remove the whole thing and replace it with the one from the original chassis that does not have any pitting under the radiator.

All in all happy with another days effort, see pictures below:

The rusted area under the rear cross member


The rear cross member with the edges rusted away


Loose rivets on the underside of the front cross member


Loose rivet on the underside of the rear engine mount

 
We now have wheels


Tomorrow, more grinding and wire brushing, and for something different, a bit of paint stripping for the rear sections of both chassis rails to remove 87 year old black paint


Monday, June 29, 2015

Sam's Chevs from Mornington Peninsula

I received an email from Sam with some great pictures of his Chev truck and 28 Roadster. The truck looks great and by the look of the roadster it will be a beautiful example when its finished.

Thanks for the photos Sam and good luck with your restoration.


Day 20 - 28 Chev Ute Restoration (29th June 2015)

Picked up the chassis rotisserie from Kevin (Kev's Chev) in Lilydale at 7.45 this morning and after a lot of puffing and panting, had the chassis set up by about 9.30.

Kevin had made the rotisserie for painting purposes, and was lockable at 180 and 360 degrees. To make it easy to work on the chassis I made another 2 locking points, meaning the chassis can be locked at 3,6,9 and 12 oclock.

Thanks for that Kevin, very handy, and good on the back.


After the first wire brushing, the top edges of both rails looks pretty good, no major concerns


A little bit of pitting under the running board irons, but nothing serious.


I wanted to make sure there was no hidden rust between riveted sections, so I ground off the rivets on the gear box mounts and steering box mount, punched out the rivets, very happy with what I found, no concerns.

This will also make it easier to get the angle grinder wire brush into a few corners on the inside of the chassis rails


All in all pretty happy with the first day working on the chassis.

Tomorrow I will get wheels under the rotisserie to move it in and out of the garage.

Sunday, June 28, 2015

Day 19 - 28 Chev Ute Restoration (28th June 2015)

Ok, the plan is slowly falling into place. I wanted to learn from my mistakes when I did the Red Chev restoration back in 1973, being, picking the best of the limited parts I had and putting them back together, without the experience to know if they were in a good serviceable condition. It took me nearly 25 years to rectify this problem.

With the ute project, and based on the above, I decided to take the time to "do it once and do it right".

This became a bit more involved, when I discovered the ute was in a poorer condition than I first thought.

The damaged chassis has been replaced, and over the last 2 weeks I have swapped for and acquired a very good rear axle housing, half axle shafts, torque tube, drive shaft and torque tube bell.

The differential crown wheel and pinion is not a problem as I have a few spares. I will use the one in the ute that is in good serviceable condition, and will be better still when I throw in a set of bearings.

This week will see as big step forward when I pick up a rotisserie to mount the chassis on to de-rust and clean up.

Todays pictures are below.

Good use for the garden tool rack in the garage


This torque tube is perfect and will be used


A very good spare


The one that was on the ute could be used, but would require a fair bit of work.


A very good set of axle half shafts (excellent key ways) from a 29 Chev will be used.


Saturday, June 27, 2015

Any one for a drive?

Check the timing, change the oil, re gap the plugs and take this baby for a spin around the block.

Ah yes, I forgot to mention, we should also check the tire pressure on the drivers side, looks a little low.

Day 18 - 28 Chev Ute Restoration (27th June 2015)

The last week has seen me collecting the best parts possible for the rear end and sorting them into useable, keep as a spare part, or bin it.

Early in the week I swapped a 29 torque tube and tailshaft with Steve from Bittern in return for the same parts for a 28. Steve also threw in a very good uni-joint bell.

These parts are in far better  condition than what I had, and an added bonus was the torque tube had zero rust under the remains of the black paint and zinc oxide primer.

So it was a very quick cleanup with a wire brush on the angel grinder.


Before


No rust here


Done and dusted


The other job that went well today was cleaning up the diff center that came with the other torque tube that I picked up from Bill Sides, a fellow member of the Dandenong Valley Historic Car Club.

The diff was rusted and locked up, and I had my doubts as to whether a few bits would be salvageable for the spares cupboard or straight to the scrap metal bin.

After  soaking in WD40, a few hard taps with a nylon hammer, followed by the 10 ton press, I had the whole thing stripped.

After two days in Rust Buster the end result is most parts of the diff are serviceable, and all it would need to be a functional unit would be to have a new shaft made for the spider gears.

The crown wheel and pinion are actually in better condition than the one used on the Red Chev from 1973 to 2007.

Below are a few before and after photos