Just a brief introduction before I ask you look at Grant's posting below.
We were treating Monty the 28 Chev for what we believed was a dead certain case of either water damage to the electrics or a fuel blockage from bouncing around on a trailer that shook rust, crap or something else loose that got into where it should not have been.
What was the real problem?
Did we think outside the square?
For these answers and more, please read the posting and see what you think, as I know I have learned a thing or two today.
http://montythe1928chevrolet.blogspot.com/2011/10/rest-video-with-new-exhaust-fittedso.html

Sunday, October 30, 2011
Friday, October 28, 2011
Start Them Young I say
Just inducting my grand kids as the next generation of Chev fanciers.
Today's lesson was "Discovering the klaxton horn"


Today's lesson was "Discovering the klaxton horn"


Thursday, October 27, 2011
2011 - 27th October - Head Studs for the future
My good friend Kevin from NSW made me up a set of head studs for the Red Chev. As any one with a Chev 4 knows, its a bugger changing head gaskets and refitting the head as you have no exact locating points to drop the head in the right position the first time.
The only way to overcome this previously was to cut the top of a few head bolts and use them as locating pins or buy a few big bolts and do the same.
The benefit of these studs is they have the normal thread on the block side, and a finer thread on the other end. This combined with modern steel enables you to torque the head tighter (if you wish) without the possibility of snapping old bolts.
These will be put into storage for next time the head comes off, which hopefully will not be for a while.
What they look like is

Massive Car and Bike Collection. This will Blow your Mind
Pictures speak louder than words.
Watch the 8 Part Video, you will not believe what one man could collect.
http://www.wheelsthroughtime.com/index.php?option=content&task=view&id=417
Here are the cars for sale
http://www.auctionsamerica.com/events/all-lots.cfm?SaleCode=LH11&Category=Automobiles
Watch the 8 Part Video, you will not believe what one man could collect.
http://www.wheelsthroughtime.com/index.php?option=content&task=view&id=417
Here are the cars for sale
http://www.auctionsamerica.com/events/all-lots.cfm?SaleCode=LH11&Category=Automobiles
Tuesday, October 25, 2011
2011 - October 25th - Zenith Carby Upgrade - Done, Dusted, Finished
Please to have finally put the job to bed, after a lot of fine tuning of linkages and the carby return spring.
I tuned the carby yesterday, which involves the normal idle adjustment screw, plus an additional adjustment which is set at running speed, 1800RPM (Boy did that make some racket in the Chev Shed)
The only real scare I had had during the whole process was straight after I tuned the carby and went for a test drive. The Red Chev was back firing badly every time I backed off or slowed down. Thinking I had stuffed up the tuning or something worse, I was relieved to find it was no more than the carby return spring not fully returning the throttle linkage to the idle position. However it took me several hours over 2 nights to get the combination of correct spring tension and accelerator pedal feel.
So far testing has indicated more power and better acceleration in 1st and 2nd gear, and in top gear seems quicker to reach 35 to 40 mph.
Fuel economy and hill performance are still to be determined, but as a general statement I believe the Red Chev will be a more pleasant car at highway cruising speeds.
The final few photos are as follows:
I was able to use the original crankcase ventilation tube with a bit of bending stretching etc.

The carby return spring, mounting bracket and one of the rose joints that remove any metal to metal contact in the carby linkages.

You can probably see from these photos that both the carby and choke linkages can be on either side, and you can see 2 of the 3 fuel inlet ports. All in all a very flexible carby for many applications.


The extra linkage installed between the accelerator pedal and the engine block.

The welded, and polished fitting with the retaining screw into the carby body

Saturday, October 22, 2011
2011 - October 22nd - Zenith Carby Upgrade - Stage 3 The Fiddly Bits
The last week and a bit has seen hours in the Chev shed like the days of old, 4 to 5 hours a night, but progress has been very good, and I am now on the home straight. After fitting the carby to the adaptor plate I then had to "tweak" with a capital T, most of the linkages.
There was a lot of cutting, bending, cutting threads, all of which soaked up an enormous amount of time, but never dampened the enthusiasm to get the result I was after.
This was never more adamant than the accelerator pedal linkage, which previously I had never been happy with. This was the time to get it right and that took me about 8 hours, including fitting an accelerator return spring with the right feel.
I took the Red Chev for the first test drive with the Zenith fitted last night (Friday 21st October), very encouraging. I was originally worried that the exhaust note was a lot louder, but that was only with no air intake hose and air filter. Once I temporarily fitted these, the exhaust note was more normal.
I found during the test drive that without being tuned yet, the Red Chev seemed to have more power in first and second, with quicker acceleration. I will update this area once the fiddly bits are completed and the carby is tuned at 1800 RPM.
This leads me to this afternoon (22nd October), and as per the picture below I have a carby fitted but no connection for the crankcase ventilation tube or the hot air intake hose.


Earlier in the week I had the local exhaust shop expand a piece of 1 1/2" tube up to 1 5/8". The outside diameter was the correct fit for the carby intake, and the inside diameter was the correct fit for the air intake tube. I regard this as a stroke of good luck, perfect fit for both requirements first try.
You can see the tube insert fitted, but I still had a problem with the crankcase ventilation tube, no connection. Now I am aware that some Chev 4 owners who have done a similar carby upgrade have fitted a small section of radiator hose into which they then inserted the crankcase ventilation tube. I chose to go metal all the way.


Being a polished metal junkie I then spent several hours polishing both parts before drilling a pilot hole and inserting a bolt to hold both parts in place for welding.


I will get the insert welded on Monday, but in the meantime, if the weather is good tomorrow, Sunday 23rd October I will do some more testing and tune the carby.
The Red Chev and the Zenith 14991 are nearly one unit at peace with the world.
Once all is well, in the next week or so I will do a shakedown run to Trafalgar to see Grant and his master Monty.
http://montythe1928chevrolet.blogspot.com/2011/10/resto-monty-leaves-trafalgar-after.html
Monty left town today, the first time in 44 years to have his exhaust replaced.
There was a lot of cutting, bending, cutting threads, all of which soaked up an enormous amount of time, but never dampened the enthusiasm to get the result I was after.
This was never more adamant than the accelerator pedal linkage, which previously I had never been happy with. This was the time to get it right and that took me about 8 hours, including fitting an accelerator return spring with the right feel.
I took the Red Chev for the first test drive with the Zenith fitted last night (Friday 21st October), very encouraging. I was originally worried that the exhaust note was a lot louder, but that was only with no air intake hose and air filter. Once I temporarily fitted these, the exhaust note was more normal.
I found during the test drive that without being tuned yet, the Red Chev seemed to have more power in first and second, with quicker acceleration. I will update this area once the fiddly bits are completed and the carby is tuned at 1800 RPM.
This leads me to this afternoon (22nd October), and as per the picture below I have a carby fitted but no connection for the crankcase ventilation tube or the hot air intake hose.

You may be able to see from the next picture that the carby air intake is bigger than the air intake hose, 1 5/8" versus 1 1/2"

Earlier in the week I had the local exhaust shop expand a piece of 1 1/2" tube up to 1 5/8". The outside diameter was the correct fit for the carby intake, and the inside diameter was the correct fit for the air intake tube. I regard this as a stroke of good luck, perfect fit for both requirements first try.
You can see the tube insert fitted, but I still had a problem with the crankcase ventilation tube, no connection. Now I am aware that some Chev 4 owners who have done a similar carby upgrade have fitted a small section of radiator hose into which they then inserted the crankcase ventilation tube. I chose to go metal all the way.

I made a connection piece from a piece of 16mm solid bar, which I drilled out in stages to 12.5 mm, the biggest drill my pedestal drill press could handle. Out came the rat tail file to finish off the hole to the right size, somewhere around 12.75 mm.
Luckily I was able to bend, stretch and manipulate the existing crankcase ventilation tube to fit the changed connection points.
The picture below shows the connection piece in place but still needing to be welded.

Being a polished metal junkie I then spent several hours polishing both parts before drilling a pilot hole and inserting a bolt to hold both parts in place for welding.


I will get the insert welded on Monday, but in the meantime, if the weather is good tomorrow, Sunday 23rd October I will do some more testing and tune the carby.
The Red Chev and the Zenith 14991 are nearly one unit at peace with the world.
Once all is well, in the next week or so I will do a shakedown run to Trafalgar to see Grant and his master Monty.
http://montythe1928chevrolet.blogspot.com/2011/10/resto-monty-leaves-trafalgar-after.html
Monty left town today, the first time in 44 years to have his exhaust replaced.
Tuesday, October 18, 2011
2011 - October 18th - Zenith Carby Upgrade - Stage 2 The Fitting
After 2 nights of heated battle with man versus machine the carby is fitted, but there are several areas that require further attention, being:
* Fine tuning the linkages
* Connecting the hot air intake
* Connecting the crankcase ventilation
* Tuning the carby
Last night was a frustrating 4 hours in the shed after I discovered he Zenith is a lot longer in the throttle stroke than the Carter carby. I had to make several new linkages and luckily was able to adjust the length of others. Several years ago I converted the metal to metal carby linkages that had an enormous amount of slop to flexible rose joints. The end result is no slop and an instantaneous throttle response. ( I will cover this in more detail in a later posting)
I also had to fit a different choke cable and housing as the old one was too short for the Zenith.
The easiest part of the operation was bolting the carby on to the manifold.


At this stage I thought I would connect the fuel and see what happens. The Zenith is a very obliging set up in that it has three possible fuel inlet ports covering 3 sides. The fuel line is connected and I turn on the tap on the Vac Tank. Instantaneously fuel starts coming out the carby air intake. Turned off the Vac Tank, wiped up the fuel, tried again, fuel pissing all over the place.
I had a hunch that the internals of the carby had to be primed at which stage it would stop dripping fuel, otherwise I am in big trouble. So I turn of the Vac Tank and try to start the engine. Turned it over a few times, kicked but would not run. Tried again, the Red Chev fired up but would not rev past idle. Jumped out thinking I had to turn the vac tank back on, which as I did I noticed 2 plug leads were disconnected. There was no great miss, just a lack of revs. Try running your modern on 2 cylinders.
After putting the leads back on the Red Chev fired up, running very smooth. This was a complete surprise as I had not yet tuned the carby, I had no choke, and the engine was on full retard. Normally the Red Chev runs pretty average on full retard, so I can only assume that when everything has been set up right, this Zenith 14991 will be a big improvement.
There was no more fuel leaking after the engine started so my hunch about the carby needing to be primed must be correct, I don't really know, but she ain't leaking anymore.
I still have a few more hours of work to get the set up right, but even at this stage I am very happy with the results so far.
Sunday, October 16, 2011
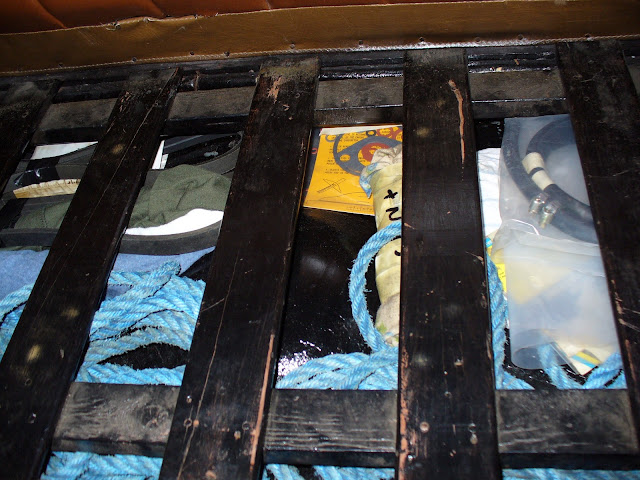
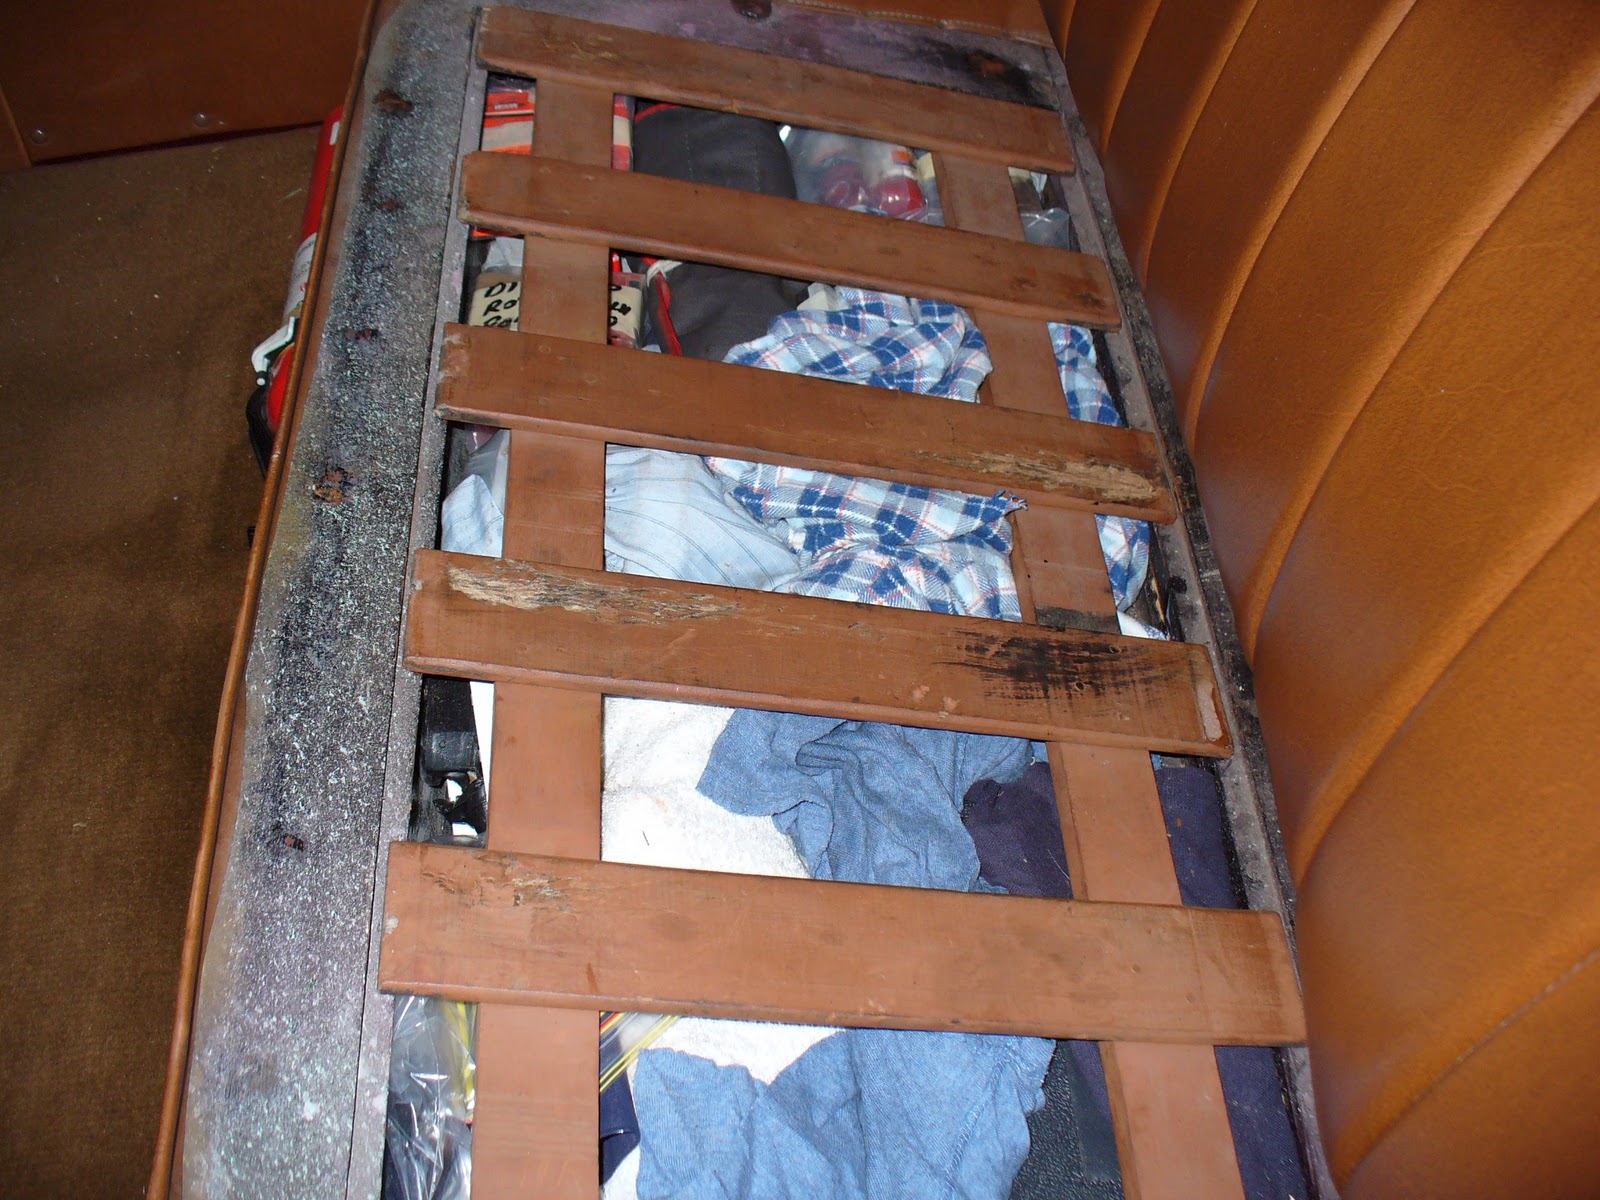
In Car Storage of Tools and Spare Parts
I carry enough tools and spares to fix most minor to medium problems, which so far I have not encountered.
I draw the line at changing a head gasket on the side of the road (unless I was doing a very long distance rally), as that's when I would call for a tow truck.
Basic tools are stored in an under bonnet mounted tool kit, with other bits and pieces out of sight under the front and rear seats.
To give you an idea of what I carry, and I have probably missed a few items, lets start with the under bonnet tool kit.
* Spanners, ring and open ended, including one for spark plugs
* Selection of screw drivers
* Selection of pliers
* Points file
* Emery board (emergency points cleaner)
* Feeler gauges
* Hacksaw Blade, with teeth removed (for setting rear brake band clearance)
* Wheel Puller
* Electrical circuit tester
* Electrical tape
* Selection of split pins


* Under the front seat is the following
* Spare set of tools
* Jack and Handle
* Water pump and gasket
* Set of pre gaped spark plugs
* Ignition coil
* Distributor cap
* Rotor button
* Distributor points
* Condenser
* Inlet and exhaust manifold gaskets
* Thermostat housing gasket
* Gasket cement
* Reconditioned distributor

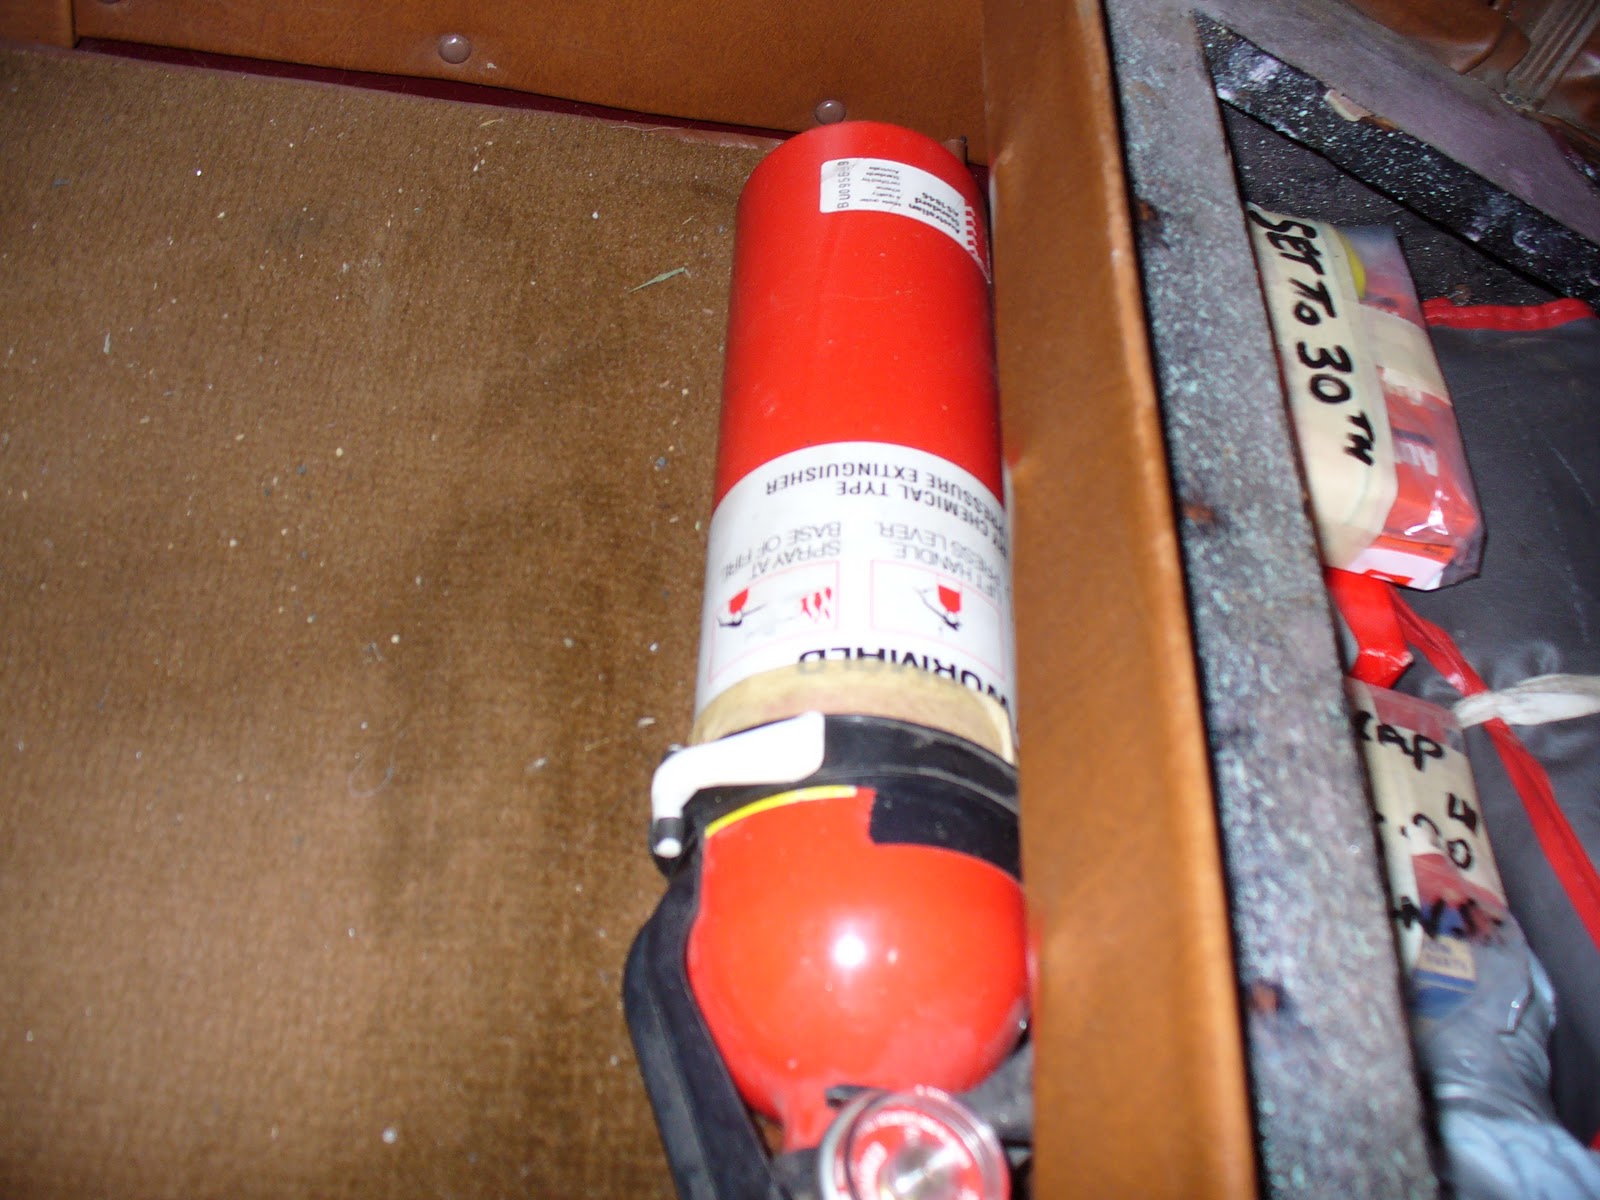
I have a fire extinguisher located on the drivers side of the front seat frame work.

The rear seats hides the following
* Tow ropes
* Fan Belt
* Fuel hose and fittings
* Carby gasket kit
* Radiator hoses
* Front wheel bearing
* Electrical Tester
* Spare fuses
In the drivers side door pocket I keep 3 bottles of petrol additive, again a very handy location, and I use two 50ml bottles for a full tank.

I welcome any comments and suggestions if you think I have overlooked an item.
I draw the line at changing a head gasket on the side of the road (unless I was doing a very long distance rally), as that's when I would call for a tow truck.
Basic tools are stored in an under bonnet mounted tool kit, with other bits and pieces out of sight under the front and rear seats.
To give you an idea of what I carry, and I have probably missed a few items, lets start with the under bonnet tool kit.
* Spanners, ring and open ended, including one for spark plugs
* Selection of screw drivers
* Selection of pliers
* Points file
* Emery board (emergency points cleaner)
* Feeler gauges
* Hacksaw Blade, with teeth removed (for setting rear brake band clearance)
* Wheel Puller
* Electrical circuit tester
* Electrical tape
* Selection of split pins


* Under the front seat is the following
* Spare set of tools
* Jack and Handle
* Water pump and gasket
* Set of pre gaped spark plugs
* Ignition coil
* Distributor cap
* Rotor button
* Distributor points
* Condenser
* Inlet and exhaust manifold gaskets
* Thermostat housing gasket
* Gasket cement
* Reconditioned distributor
I have a fire extinguisher located on the drivers side of the front seat frame work.
The rear seats hides the following
* Tow ropes
* Fan Belt
* Fuel hose and fittings
* Carby gasket kit
* Radiator hoses
* Front wheel bearing
* Electrical Tester
* Spare fuses

In the drivers side door pocket I keep 3 bottles of petrol additive, again a very handy location, and I use two 50ml bottles for a full tank.

I welcome any comments and suggestions if you think I have overlooked an item.
Saturday, October 15, 2011
Improvement no 8 - Wind and Waterproofing for Highway Driving
Before this modification the wind and rain would come in under to top of the hood and all around the windscreen. It was not a pleasant experience.
2010 saw the Chev doing a lot more highway driving, so I embarked on a mission to reduce the amount of wind and water coming in through the front of the car.
Step 1 - Where the hood fits over the top of the windscreen, there is a double flap, one side goes to the outside of the windscreen frame, the other to the inside. This never seemed to work, so I fitted self adhesive Velcro to both sides of the top of the windscreen frame, with the other part of the self adhesive Velcro to the inside surfaces of the flap. This was an immediate success, and reduced by about 95% wind and rain coming in over the top of the screen, and can not be seen from the outside.
Step 2 - Now the upright posts. I have the original Holden Body Works specification side curtains that I think were supposed to work by air pressure pushing them against the windscreen uprights and screen. They were not very effective. I had the idea that if I made a vinyl insert to fit in behind the side curtains and come out a bit further across the edge of the screen this may help. I made up a couple of heavy cardboard templates and had Grant White, Motor Trimmer, from Rosanna Victoria 9458 3479, make up a pair from vinyl to match the hood. I then fitted longer press stud fittings on the windscreen uprights to take double thickness material. Pleased to say this worked very well also, and eliminated the majority of wind and water coming in through the sides of the windscreen.
This photo shows the windscreen upright and screen frame with the side curtain removed.

This is the insert I had made up

Here is the insert fitted

The next is the side curtain about to be pressed into the studs
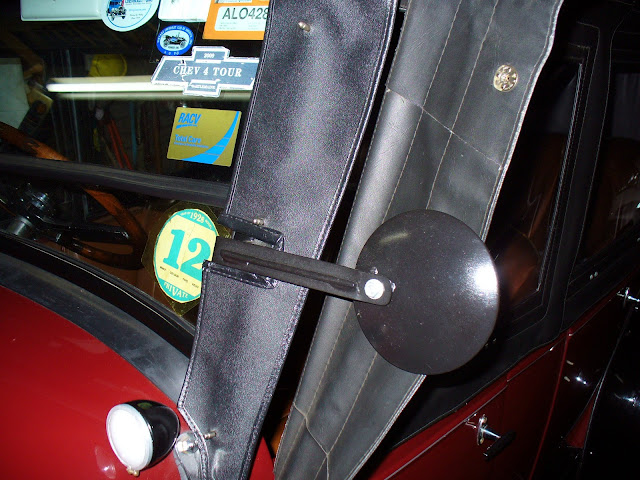
And fully fitted, this is the end effect. You can see the extra material coming out from under the side curtain. As I was careful not to protrude past the windscreen frame it does not hinder my vision.

The final part of the jigsaw was the poorly fitting rubber strip between the bottom of the windscreen frame and the top of the cowl. I had previously bought 2 x rubber kits for a 1928 Chev from two different dealers that turned out to be wrong. The T section they supplied was 1.5 inches, when it should be 2 inches. I only found this out by sheer chance when I was looking to buy a rubber profile to make my own fix. The was not needed as when I fitted the correct T section after 30 odd years, problem solved. Once again I did not know any better, but do now. You can see from the pictures above and below that the T section has an interference fit against the cowl, and with a slightly raised lip on the cowl behind the rubber, hey presto, problem solved.

These modifications combined with a previous one to the sides of the hood http://my28chev.blogspot.com/2011/08/2011-14th-august-improved-wind-sealing.html
now make the Red Chev a much more pleasant car to drive.
Friday, October 14, 2011
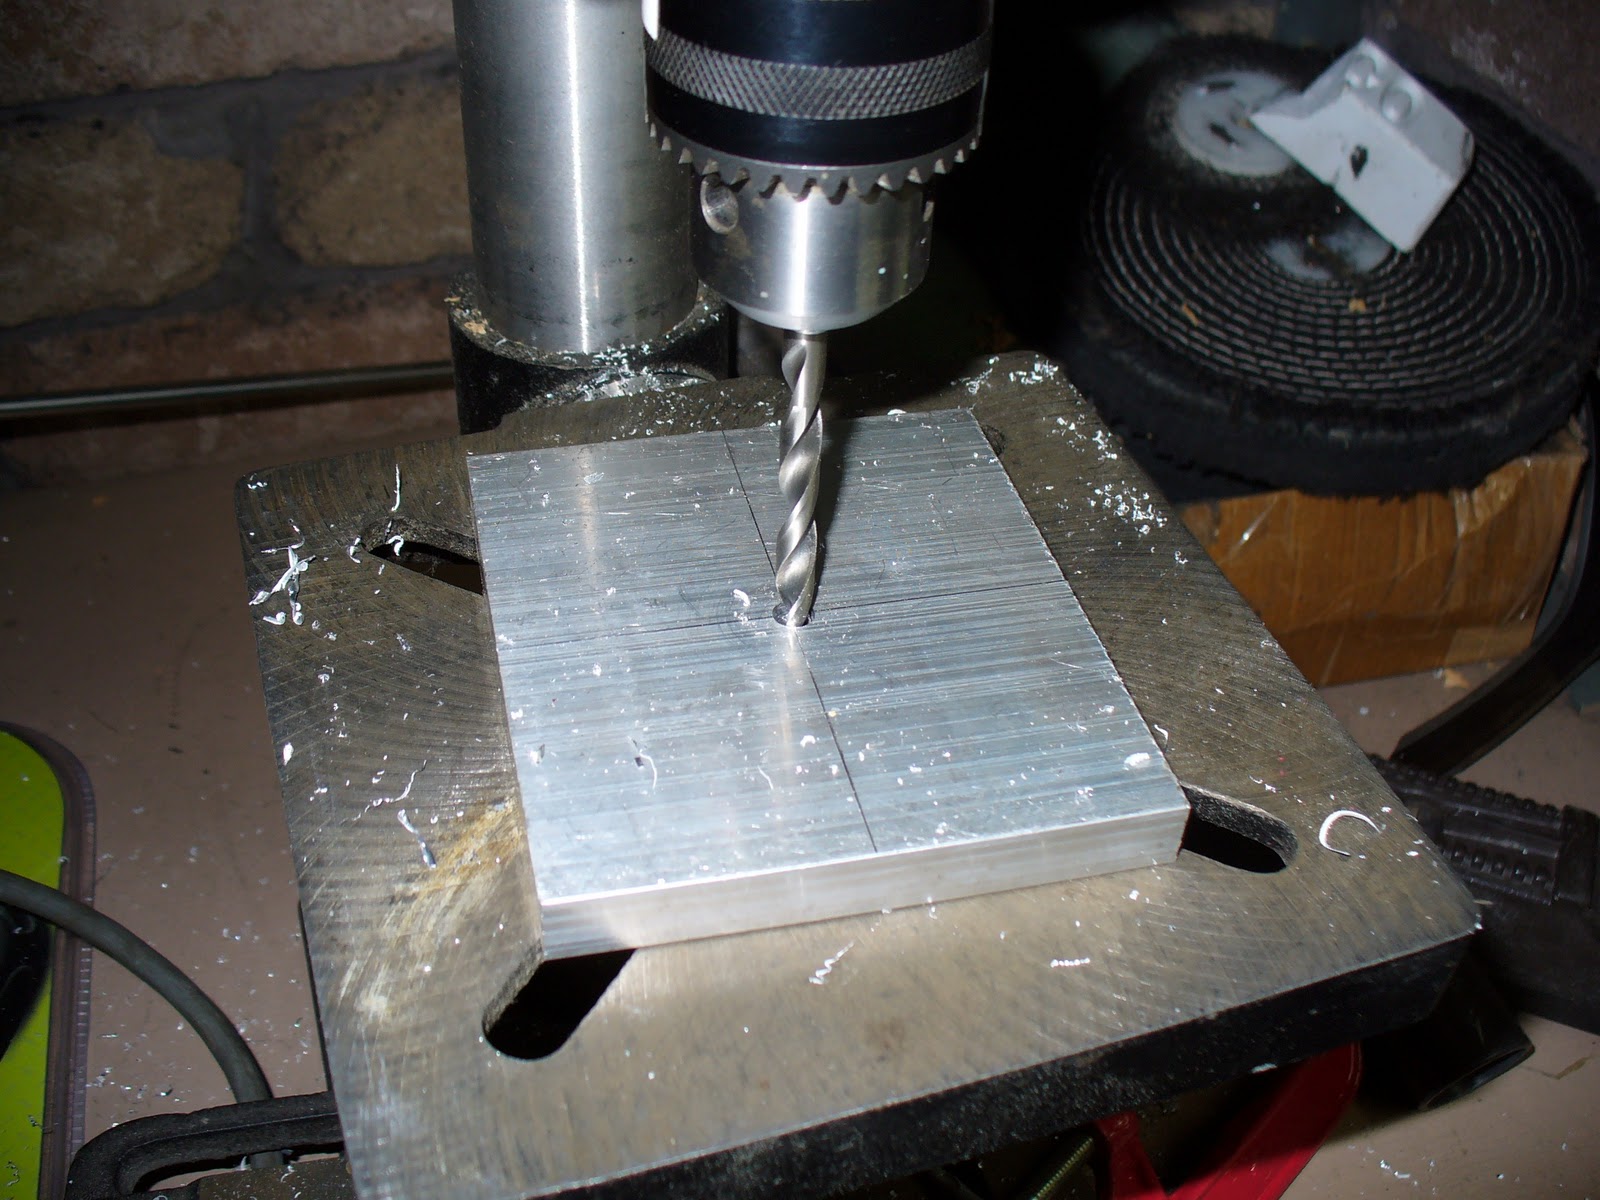
2011 - 14th October - Carby Upgrade Stage 1 - Adaptor Plate
The first thing required for fitting a Zenith 14991 to a Chev 4 is to make an adaptor plate, which is required as the mounting holes are 90 degrees different to the carter carby. In simpler terms the carter holes run across the inlet manifold, whereas the Zenith's mounting holes run along the manifold.
Not having a milling machine, I spent approx 10 hours drilling, filing and polishing, which also included throwing out the first attempt as I did not like the way it was turning out. The filing was the killer.
Drilling the pilot hole
 Boring the Centre hole

Lining up for drilling the Zenith mounting holes


Anyone for Swiss cheese (or death by a 1000 holes)


Many hours later, the finished plate


Not having a milling machine, I spent approx 10 hours drilling, filing and polishing, which also included throwing out the first attempt as I did not like the way it was turning out. The filing was the killer.
Drilling the pilot hole

Lining up for drilling the Zenith mounting holes


Anyone for Swiss cheese (or death by a 1000 holes)


Many hours later, the finished plate


And a few shots of how it all fits together


You may notice a gap between the manifold and the adaptor plate on the following shots. There is a bit of interference between the edges of the manifold flange and the bolt heads securing the Zenith to the adaptor plate. This will be a simple fix requiring slightly reducing the edge of the manifold flange and possibly fitting socket head bolts instead of hex head.


Tuesday, October 11, 2011
Improvement no 7 - Headlights (Done in the 80's and just remembered)
I was talking by email to Jerry, my good friend from the States today, and when he mentioned improving headlights in his Chev truck I recalled the previously forgotten 7th improvement done to the Red Chev back in the 80's.
But before I talk headlights, let me introduce you to my good friend Jerry, his loyal companion Sadie and his Chev truck.


Going for broke I fitted 50 candle power thinking that would solve the problem. The results were still below expectations and the conventional globes as shown below were consigned to the parts cupboard, where they still live some 30 plus years later.


But before I talk headlights, let me introduce you to my good friend Jerry, his loyal companion Sadie and his Chev truck.


Now getting back to headlights, from day one when the Red Chev hit the road back in 1975, I was never happy with the headlights. I tried several minor upgrades, going from the original 11 candle power, that's correct, the power of 11 candles, to 21 candle power, with no success.


Out driving one Sunday afternoon I called into my local garage to fill up, and talking to the guy behind the counter about the Red Chev I mentioned my frustration with the headlights and that I had tried every possibility with a 6 volt system.
Try these he said, as he lifted 2 boxes from under the counter, being 6 volt Quartz Halogen globes as fitted to Volkswagen.

They will never work I thought to myself. My 6 volt genny wont have the output to power them. But I was desperate for a solution, as the alternatives were no night driving or a 12 volt conversion. Both of which were out of the question. I had decided back in '73 to stay with the 6 volt system, and to this day I am still happy with that choice.
Before I fitted the QH globes I spoke to a few Chev guys who were very negative.
" They wont Fire up"
"They will be way too hot"
"You will crack your lenses after 5 minutes"
Any way I pressed on, and pleased to say a trail blazer back then, as the Filling Station in the USA now has 6 volt Quarts Halogen conversion kits for Chev 4's.
The only difference from my conversion to the Filling Station kit, is I have mounted the globes from the front, whereas the Filling Station kit mounts the globes from the back, as per the standard H4 globe fit in modern headlights. As I was a bit rough in those days I took the easy way out, but it worked, and it worked well, and it still does.
I rewired a low beam wire back to the light switch to give me a true high and low beam as opposed to the original resistor in the light switch that simply reduced the voltage to the globe on low beam.
In the early days until I realised my headlights were mounted over an inch too high on the car as well as to high to the road surface it was common to be flashed for having headlights that were too bright. A pretty good indication I had a good light source.
I refitted the headlights in 2009 after discovering they were mounted too high during the Chev 4 Tour at Castlemaine, Victoria. There was a row of some 20 plus Chevs and a guy walking up and down saying your headlights are the right height, yours are wrong, your are correct etc. Four of us in the line up had made the simple mistake of fitting the adjusting bell on the bottom of the headlight shell on top of the headlight bar instead of being underneath. In my case it went unnoticed from 1975 to 2009. Hey you cant rush these things.
If you look at the fourth car on the left hand side of the picture below (The Red Chev) you will see that the headlights appear higher in relation to the others close by. If you double click on the picture it will go full size for a better look.

I then found a posting on a Chev web site describing how to correctly adjust Chev 4 headlights. I can now drive at night confident that my headlights are up to standard, with a low beam that gives a good spread on the road, and a high beam that if I use does not blind oncoming drivers.
I still have to ascertain the amount of drain, if any, on the battery if I run the lights for a prolonged period, and that will come with experience. So far suburban night driving has not been a problem, and hopefully as I run a dual battery setup it should reduce the effect.
What do you think?
I have included a few more photos below


Thank you to Jerry for stimulating a few more grey cells back into action to recall this modification.
Subscribe to:
Posts (Atom)