

Thursday, December 31, 2015
Day 89 - 28 Chev Ute Restoration (31st December 2015)
Up at 5.30am this morning to drive up to Trafalgar, round trip 226 k's to see Grant Fowler and pull the 4 disc wheels off the spare rolling chassis to hopefully make up a complete set of 4 good wheels.
As you know the score yesterday was 3 good steel disc wheels out of a possible 9.
We had the wheels off in about 15 minutes and after a coffee, home by 10.45am.
Unloaded the wheels under the supervision of my workshop manager, stripped off the tyres and rims, then decision time.

I spun the 4 of them on the hub, all pretty good, and was able to knock a couple into a slightly better condition.
All 4 wheels had a heavy top coat, with a primer and etch primer underneath. The temptation was to just rub them back and hit it with a top coat.
As we all know people always make sure the base metal is sound before they repaint.
Having been caught before I know this is not the case, so I made the decision to strip them all back to bare metal.

On closer inspection one had heavy corrosion damage to the rim and with a bit of prodding broke through to the other side. Scratch 1 wheel, down 3 to go.


2 wheels appeared ok, the third was not so good. Severe pitting was filled up with numerous layers of paint, and a brazing repair had been done to fill a full thickness hole.
Directly on the other side of the wheel 180 degrees was a deep pitted area that when probed broke through to the other side.
Scratch wheel number 2, 2 to go.


The progressive score yesterday was 3 good wheels from 9, the final score is 5 good wheels from 13.
Down the track I will look a repairing a few as spares, but unless I was desperate would not use rusted through wheels, wheels with excessive run out, and wheels with extensive welding repairs.
A cracked rim should be scrapped without a second thought.
A few of the issues I encountered would have been a possible fix if Chev had not changed the manufacturing process for Disc wheels in 1928.
Up to 1927 steel disc wheels were made using rivets to attach the rim to the wheel center. These could easily be drilled out to separate the rim from the center.
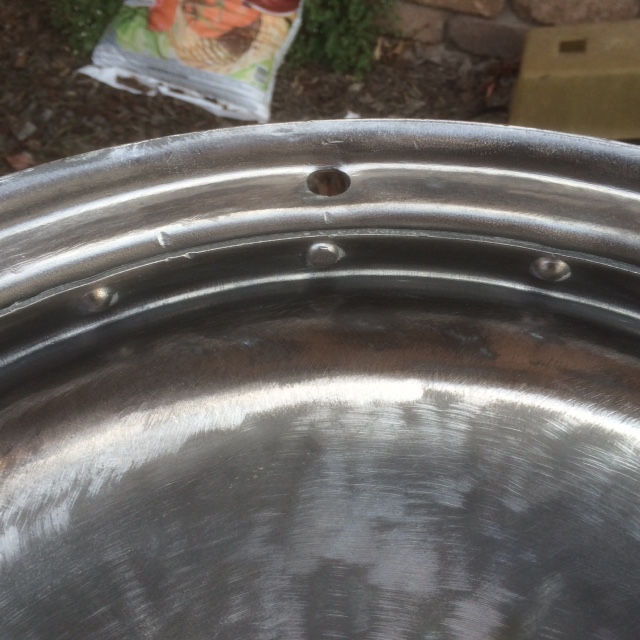
For 1928, and probably to save money, rivets were only used in every 4th hole, with the next two holes replaced by piercing and punching the rim material into a domed rivet head looking pressing in the wheel center. At first glance it looks like a normal rivet head.
The following picture shows the rivet on the right and the pierced pressing on the left.

This picture shows rivets in the 1st and 4th location, with pierced pressing in the two locations in between.

On the inside of the wheel its easier to make out the rivet head in the middle, with the make believe rivet heads on each side.


The difficulty in disassembling a 1928 steel disc wheel is you would have to drill a hole large enough to remove the full dome pressing in the wheel center.
That would mean a pretty large diameter dome head bolt to reassemble.
Still, that's for another day.
As you know the score yesterday was 3 good steel disc wheels out of a possible 9.
We had the wheels off in about 15 minutes and after a coffee, home by 10.45am.
Unloaded the wheels under the supervision of my workshop manager, stripped off the tyres and rims, then decision time.

I spun the 4 of them on the hub, all pretty good, and was able to knock a couple into a slightly better condition.
All 4 wheels had a heavy top coat, with a primer and etch primer underneath. The temptation was to just rub them back and hit it with a top coat.
As we all know people always make sure the base metal is sound before they repaint.
Having been caught before I know this is not the case, so I made the decision to strip them all back to bare metal.

On closer inspection one had heavy corrosion damage to the rim and with a bit of prodding broke through to the other side. Scratch 1 wheel, down 3 to go.


So we are down to three, still pretty good odds I thought

2 wheels appeared ok, the third was not so good. Severe pitting was filled up with numerous layers of paint, and a brazing repair had been done to fill a full thickness hole.
Directly on the other side of the wheel 180 degrees was a deep pitted area that when probed broke through to the other side.
Scratch wheel number 2, 2 to go.


The progressive score yesterday was 3 good wheels from 9, the final score is 5 good wheels from 13.
Down the track I will look a repairing a few as spares, but unless I was desperate would not use rusted through wheels, wheels with excessive run out, and wheels with extensive welding repairs.
A cracked rim should be scrapped without a second thought.
A few of the issues I encountered would have been a possible fix if Chev had not changed the manufacturing process for Disc wheels in 1928.
Up to 1927 steel disc wheels were made using rivets to attach the rim to the wheel center. These could easily be drilled out to separate the rim from the center.
For 1928, and probably to save money, rivets were only used in every 4th hole, with the next two holes replaced by piercing and punching the rim material into a domed rivet head looking pressing in the wheel center. At first glance it looks like a normal rivet head.
The following picture shows the rivet on the right and the pierced pressing on the left.

This picture shows rivets in the 1st and 4th location, with pierced pressing in the two locations in between.

On the inside of the wheel its easier to make out the rivet head in the middle, with the make believe rivet heads on each side.
The rivet head look alike pressing up close.

The difficulty in disassembling a 1928 steel disc wheel is you would have to drill a hole large enough to remove the full dome pressing in the wheel center.
That would mean a pretty large diameter dome head bolt to reassemble.
Still, that's for another day.
Wednesday, December 30, 2015
Day 88 - 28 Chev Ute Restoration (30th December 2015)
Today was 3 steps forward and 1 step back
To be precise, cleaning up what I thought was 4 good wheels out of 9 turned out to be 3 good wheels out of 4.
Wheels 1, 2 and 3 are great, see pictures below.


Wheel number 4, now that's a real trouble maker.
Cleaned up the outside, discovered what looked like a series of cracks and in places delaminating.
Rubbed some black paint into the area, yep, scratch one disc wheel.
First series of pictures is the outside of the wheel.


The next few pictures are on the inside of the wheel in the same location, so there was no doubt they were all the way through.


Will head up to see Grant Fowler http://montythe1928chevrolet.blogspot.com.au/ at Trafalgar bright and early in the morning, swap over 4 bad wheels for the ones on the spare rolling chassis, and hopefully will get some more good ones.
To be precise, cleaning up what I thought was 4 good wheels out of 9 turned out to be 3 good wheels out of 4.
Wheels 1, 2 and 3 are great, see pictures below.


Wheel number 4, now that's a real trouble maker.
Cleaned up the outside, discovered what looked like a series of cracks and in places delaminating.
Rubbed some black paint into the area, yep, scratch one disc wheel.
First series of pictures is the outside of the wheel.


Two cracks in one

This one seems to go on for ever

The next few pictures are on the inside of the wheel in the same location, so there was no doubt they were all the way through.


Will head up to see Grant Fowler http://montythe1928chevrolet.blogspot.com.au/ at Trafalgar bright and early in the morning, swap over 4 bad wheels for the ones on the spare rolling chassis, and hopefully will get some more good ones.
We love working on old cars, don't we. Just had to remind myself.
Monday, December 28, 2015
Day 87 - 28 Chev Ute Restoration (28th December 2015)
A few jobs on the go today.
Firstly I assembled the front hubs.
This


I fitted the passenger side hub so I could spin each of my available wheels to find the best 4 to use. Very pleased to see the hub ran true, and the brake drum as perfect as a pressed drum could be.
Could not say that for the drivers side hub, more about that further down the posting.


First one was as straight as an arrow, both front and back.

Out of the 9 wheels I had to choose from, and yes, allowing for the fact that I am pretty fussy, and want to use the best parts available, I was able to find 4 wheels that I was happy with.
The main things I was looking for was as little run out as possible on each of the front and rear edges of the wheels.
A couple had rust holes right through, a couple more had the same degree of run out on the front and rear edges in the same spot, indicating the wheel may be bent from the center.
I was lucky I had a few wheels to choose, otherwise I would have a lot of work ahead of me.
Now getting back to the passenger hub, that as I mentioned I am not happy with. Way too much run out, even for a pressed brake drum, and not convinced the hub is running true either.
Yes, these old Chevs can occasionally be a pain in the ..............but we still love em.
Not a mad rush, but I will build up another hub and brake drum and see what that is like, the main reason is I don't want to be knocking wheels studs in and out too much.
I had selected the best hubs out of 5, but very quickly pulled a spare front end apart to use the hubs, and depending how they come out of the molasses bath, the drums as well.
The two hubs below were very quickly cleaned up and both have good threads for the hub caps and the bearing shells were firm to hard to remove, meaning the outer shell has not been spinning in the hub, something I have come across a few times, not good.


Firstly I assembled the front hubs.
This

Came from this

And this

Came from this

I fitted the passenger side hub so I could spin each of my available wheels to find the best 4 to use. Very pleased to see the hub ran true, and the brake drum as perfect as a pressed drum could be.
Could not say that for the drivers side hub, more about that further down the posting.

A very scientific piece of wood with a three inch nail as my measuring gauge.

First one was as straight as an arrow, both front and back.

Out of the 9 wheels I had to choose from, and yes, allowing for the fact that I am pretty fussy, and want to use the best parts available, I was able to find 4 wheels that I was happy with.
The main things I was looking for was as little run out as possible on each of the front and rear edges of the wheels.
A couple had rust holes right through, a couple more had the same degree of run out on the front and rear edges in the same spot, indicating the wheel may be bent from the center.
I was lucky I had a few wheels to choose, otherwise I would have a lot of work ahead of me.
Now getting back to the passenger hub, that as I mentioned I am not happy with. Way too much run out, even for a pressed brake drum, and not convinced the hub is running true either.
Yes, these old Chevs can occasionally be a pain in the ..............but we still love em.
Not a mad rush, but I will build up another hub and brake drum and see what that is like, the main reason is I don't want to be knocking wheels studs in and out too much.
I had selected the best hubs out of 5, but very quickly pulled a spare front end apart to use the hubs, and depending how they come out of the molasses bath, the drums as well.
The two hubs below were very quickly cleaned up and both have good threads for the hub caps and the bearing shells were firm to hard to remove, meaning the outer shell has not been spinning in the hub, something I have come across a few times, not good.

The next job was to remove a pair of running boards from the molasses bath, and put in another pair.
With a bit of repair here and there I should be able to get a serviceable pair out of the 4.
The first photo is straight out of the molasses bath and washed down with the hose, and you can see the surface rust starting straight away.
The second photo is after they have been wiped down with rust buster, which will keep them rust free until I start working on them.
This pair were amongst the spares that came with the ute, and surprisingly the ones on the ute are in better condition.


The next few days will be spent working on the 4 disc wheels
Sunday, December 27, 2015
Day 86 - 28 Chev Ute Restoration (27th December 2015)
Top coat today......... Assemble and fit front hubs tomorrow?


Saturday, December 26, 2015
Day 85 - 28 Chev Ute Restoration (26th December 2015)
Today was a slow progress day, but the end result was very rewarding, and will be more so tomorrow when the black paint final coat is applied..
Anyway, we are converting these


Five front brake drums were de-rusted in the molasses bath a few months back, and after I selected the best two a protective coating of rustbuster was removed with a powered wire brush.


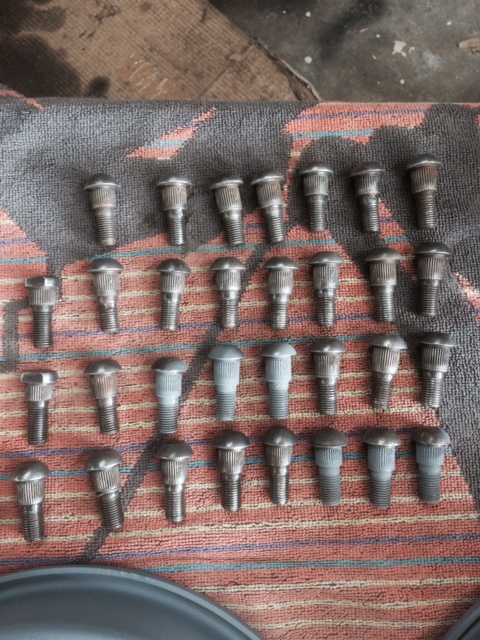
I found 5 good sets (30) of wheel studs out of about 10 sets (60), which required wire brushing and cleaning the thread

The hub grease seals were disassembled, the felt inner replaced and then put back together.


The main grease seal is two part, with this part sitting behind the inner bearing outer, up against the brake backing plate

The second part of the grease seal is held onto the inside of the brake drum by the wheel studs.


Primer today, all being well, full gloss black top coat tomorrow or Monday.


Anyway, we are converting these


Into something looking like this

Five front brake drums were de-rusted in the molasses bath a few months back, and after I selected the best two a protective coating of rustbuster was removed with a powered wire brush.


I found 5 good sets (30) of wheel studs out of about 10 sets (60), which required wire brushing and cleaning the thread

The hub grease seals were disassembled, the felt inner replaced and then put back together.


The main grease seal is two part, with this part sitting behind the inner bearing outer, up against the brake backing plate

The second part of the grease seal is held onto the inside of the brake drum by the wheel studs.

The next job was the fit the inner and outer front wheel bearing shells.


Disc wheel retaining plates

Front hubs

Primer today, all being well, full gloss black top coat tomorrow or Monday.


One step closer to fitting wheels to this beast
Subscribe to:
Posts (Atom)