
Sunday, July 19, 2015


Day 26 - 28 Chev Ute Restoration (19th July 2015)
My life seems to be revolving around springs ...... but at last something different.... a bit of front axle as well.
One front spring came out of the Rustbuster yesterday, looking pretty good, roughly clamped together in this picture for checking.

Another front spring having a Rustbuster bath since yesterday afternoon, high pressure cleaned this morning, back in the bath to clean up a few more bits and will come out tomorrow.

The Ute has had a very hard life, and the front axle is no exception. It has a bow both ways, up and down, and front to back. The up and down was not a major concern, but the combination of being bent both ways would not be the best for both tire wear and handling. Any one driving a Chev 4 would agree, these old things certainly do not want any reduction to the limited handling they came out with.
Luckily I have had a spare front axle tucked away in the spares collection since the seventies.
If you look at the picture below, the original ute front axle is on the left, with a bow left to right.

With the ute having had at least one major prang, I did a few measurements on both axles. With both axles butted up to each other, the gap between the brake backing plate mounting points, is different from one end to the other.


The comparison indicates the ute axle has a slight bend between the spring mount and the stub axle as well as between both spring mounts.

Both ends of the ute axle are showing a difference of 1/16 compared to the spare axle.

The next 2 pictures show the front to back bend in the ute axle (first picture) compared to the spare axle (second picture)


The next measurement checked was the up and down bend in the ute axle which was 5/16 compared to the spare axle which was zero.


So its no surprise to say "I will be using the spare axle" Very relieved that I have kept it all these years.
Another job I did this morning was to take the parts that have been in the molasses bath for 2 weeks, gave them a high pressure wash, then back in for another 2 weeks. I had thought the cold weather may have slowed down the molasses dissolving the rust, but at 2 weeks a bit more than half the rust has gone, another 2 weeks should clean it up nicely.
I am in no hurry!!
A few pictures of the partially de-rusted bits and pieces.


That's for this weekend except to say..... Once the weather warms up, I have a serious amount of painting to do.
Can't wait for that.
One front spring came out of the Rustbuster yesterday, looking pretty good, roughly clamped together in this picture for checking.

Another front spring having a Rustbuster bath since yesterday afternoon, high pressure cleaned this morning, back in the bath to clean up a few more bits and will come out tomorrow.

The Ute has had a very hard life, and the front axle is no exception. It has a bow both ways, up and down, and front to back. The up and down was not a major concern, but the combination of being bent both ways would not be the best for both tire wear and handling. Any one driving a Chev 4 would agree, these old things certainly do not want any reduction to the limited handling they came out with.
Luckily I have had a spare front axle tucked away in the spares collection since the seventies.
If you look at the picture below, the original ute front axle is on the left, with a bow left to right.

With the ute having had at least one major prang, I did a few measurements on both axles. With both axles butted up to each other, the gap between the brake backing plate mounting points, is different from one end to the other.
First picture

Second picture

The comparison indicates the ute axle has a slight bend between the spring mount and the stub axle as well as between both spring mounts.

Both ends of the ute axle are showing a difference of 1/16 compared to the spare axle.

The next 2 pictures show the front to back bend in the ute axle (first picture) compared to the spare axle (second picture)


The next measurement checked was the up and down bend in the ute axle which was 5/16 compared to the spare axle which was zero.


So its no surprise to say "I will be using the spare axle" Very relieved that I have kept it all these years.
Another job I did this morning was to take the parts that have been in the molasses bath for 2 weeks, gave them a high pressure wash, then back in for another 2 weeks. I had thought the cold weather may have slowed down the molasses dissolving the rust, but at 2 weeks a bit more than half the rust has gone, another 2 weeks should clean it up nicely.
I am in no hurry!!
A few pictures of the partially de-rusted bits and pieces.


That's for this weekend except to say..... Once the weather warms up, I have a serious amount of painting to do.
Can't wait for that.
Saturday, July 18, 2015
Wednesday, July 15, 2015

Sunday, July 12, 2015
Day 25 - 28 Chev Ute Restoration (12th July 2015)
This weekend was all about springs.
Both front and rear springs on the ute are very worn, with a deep wear mark into the top leaf from the snubber spring.
Sam from Tyabb, the owner of a 28 Chev truck and 28 Roadster, found me a set of rear springs and by a stroke of luck on the way home I scored a set of front truck springs that I can convert to car springs.
Working on the front springs, the first step was to strip and inspect.




Both front and rear springs on the ute are very worn, with a deep wear mark into the top leaf from the snubber spring.
Sam from Tyabb, the owner of a 28 Chev truck and 28 Roadster, found me a set of rear springs and by a stroke of luck on the way home I scored a set of front truck springs that I can convert to car springs.
Working on the front springs, the first step was to strip and inspect.

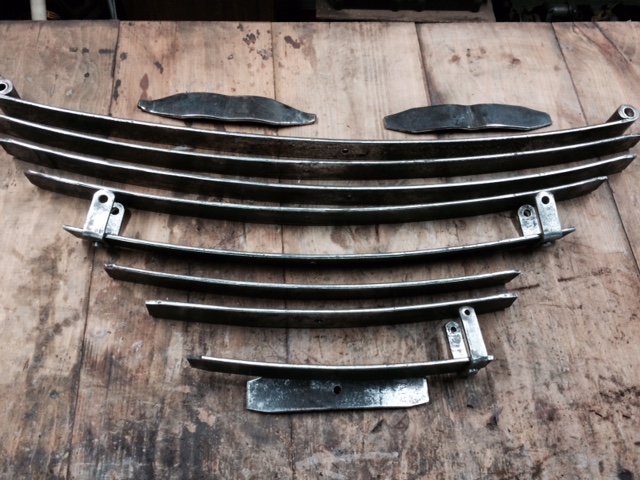
A truck spring stripped. The truck spring has 9 leaves and the car 7.

Stripped, sanded and wire brushed, this 28 truck spring will be rebuilt as a car spring.

The original ute springs stripped and wire brushed.

The original ute front spring top leaf with snubber spring wear that is a bit too much for me to be comfortable with, I estimate worn through half the leaf thickness.


Tuesday, July 7, 2015

Subscribe to:
Posts (Atom)