There have been only 2 times that the car had to be towed home, the first in 1979, and the second in the late 80's. On both occasions my wife Jan drove the towing car.
1st Breakdown
The event took place very close to home when we lived in Boronia, and it was on the way home after a drive around the mountains. All of a sudden the engine dies about 400 metres from home. Did not want to fire, no sign of life. Did all the usual checks and tricks. It was not going any where. Not wanting to abandon the car and walk home, noticed one of the neighbours kids walking past and bribed him with 50 cents to sit on the running board and wait for my return, with car, rope and most importantly wife. The car was towed home, pushed into the garage and left till the next morning.
Next day I checked fuel, no dramas. Checked for spark and found it was either weak, intermittent or just plain not there. Checked wire to the coil, wire to the dizzy and checked points, all seemed ok, but was still getting intermittent spark across the points. Only test instrument I had in those days was a circuit tester, globe on, globe off. Pretty simple, but I didn't know too much myself back then. Any way, after cleaning out the inside of the dizzy, checking points and insulator for shorting, put everything back together, kicked it in the guts and she fired. Job done, no sweat, and thought that was the end of it.
How wrong can one be?
2nd Breakdown (The Chevs First Wedding)
Lets skip forward to the late eighties. It was a Saturday, and I was returning home from doing a wedding over the other side of town, Essendon or some where over that way. I wont even try to tell you about the wedding, but lets just say that Vintage cars and a traditional Lebanese wedding don't really go together. But hey, I made $100 bucks for day and got a free feed out of it. Time to leave as the boys outside were getting a little bit out of hand, and they were too close to the car.
Off home I go, no freeway driving in those days, so its about an hour later and I am coming down the Canterbury Road hill from Heathmont heading towards Bayswater Road, where Anaconda, Red Rooster and McDonalds are now. But not then. As soon as I cross over Bayswater Road, engine dies and I roll to a stop right out the front of the old Fibre Makers factory .Its dark, its cold and its about 10.30 at night. Did I have a torch. Well, lets not worry about minor details. What ever shops were nearby were long closed, no ones around and what ever few cars went by were not in stop mode. Only thing was to turn off the petrol, take off the radiator cap so no one would pinch it and walk to a phone box, call my dear wife and ask her to tow me home. You remember phone boxes don't you? That was back in the old days when we owned the telephone system, not some multinational.
Anyway, about half an later Jan turns up with the car, the rope and this time, two young children whose mother was not happy bringing them out so late. For some reason though, Ross aged about 9, and Melanie about 6 thought it was great fun, as they both made faces through the back window of the car all the way home. Car and kids were both put to bed as quickly as possible.
In the morning I am in the garage trying to get the dam thing started. Remembering what happened last time, and with a few more testing devices, I discover fairly quick that there is not a consistent current going to the coil, and when I jiggle the wire its constant current. So I run a fresh wire from the ignition switch to the coil, fires up, no problem. So this I say to myself is what the problem was way back then and now it is fixed, done, never to bother me again.
And you know it never did happen again, but.
Some 19 years later, when I stripped out the steering column to polish up the casing and replace a few bushes etc, I thought I would recondition the ignition switch. Pulled it apart gave it a bit of a clean up, polished the contacts and re soldered the wires after I put a current across it and using a Multimeter, was not satisfied that it was passing a full current, and further more if moved a few thou in either direction would cut out. Sound familiar. I thought so too. Under the dash I found and uncoiled the "offending" wire that originally ran from the ignition switch to the coil, and found the other end that I had coiled up under the bonnet. I probably did not remove it back in 79 as it was part of the woven wiring harness, but cant remember. Any way, just for fun thought I would reconnect it and see what happened, as it was a nicer looking wire than the modern red plastic one I had installed in 79.
Funny thing happened, car started, ran perfectly with no problems. Isolated the "offending" wire and ran a load test with 24 volts. No drop in the current or amperage. So there was nothing else to do but reconnect the said "offending " wire and let it redeem its self after being carted around coiled up under the dash for 19 years. Well what do you know, that wire has behaved perfectly since then, and could even be almost be forgiven. Was it a faulty ignition switch or a faulty wire that was born again after being out of work for 19 years? I have my opinion, but I will let you make your own decision.
Seriously though, I am extremly proud that a car I built with my own hands from a heap of parts, some good, some bad has only let me down twice in 38 years, and on both occassions was a fairly simple electrical problem. Apart from the fitting of 2 replacement exhaust systems, no other person apart from myself has ever worked on that car since it first turned a wheel in anger back in 1975. Do I worry now about a mechanical break down? Not in the slighest. Mobile phones have been invented, and as a member of the RACV, they care. More importantly, they tow.

Friday, April 29, 2011
Wednesday, April 27, 2011
Two Major Repairs. 1981 and 1986
Apart from a mini restoration that I did in 2007 for my daughters wedding, which I will cover later in a dedicated posting, the car has undergone two substantial repairs. The first being universal joint housing / gear box main shaft in 1981 and a replacement set of gears in 1986.
Universal Joint Housing / Gear Box Main Shaft. 1981
In early 1981, I became aware of a noise and vibration coming from the gearbox and universal joint area. I went through all the normal checks, such as making sure the uni was lubricated, checked the uni housing, then the uni joint itself for any loose nuts, all seemed ok. The only hint to what was
causing the noise was in the beginning it would change pitch and sometimes momentarily disappear when the car went over bumps or was loaded up with passengers. Unfortunately I was not in touch with the car enough to realize the clue that was right in front of my nose. Anyway I pushed on regardless and was determined to fix the bloody thing.
I then decided that it must be the uni joint. I did not really know, but it seemed like a good place to start. There were slight scars on the uni joint body and inside the torque tube bell that may have been recently made, or could have been there for years. I replaced joint after joint one, two, three and four in quick succession. Each test drive ended in frustration as things were quiet for a mile or two, then the noise and vibration started again. That was the second clue that I did not recognize. I then got a
bee in my bonnet that the uni body was hitting the inside of the torque tube bell, so I ground down the uni body, re-assembled, went for a test drive, perfect, then the same problem, same noise.
So, no machine is going to beat me. It was time to get serious.
God I wish there had of been a Chev web site back then.
Dropped the tail shaft , checked the bushing, all was ok. took the top off the transmission, and after a lot of cleaning and de-greasing, discovered play between the input and lay shafts. Removed the uni joint, stripped the uni housing from the back of the transmission, and was able to pull out the lay shaft through the rear of the box, and the sliding gears through the top. Unfortunately for me I would become an expert at this as I did it many times over the next few weeks. Replaced the bushing between the input and lay shaft, re-assembled, test drive, same again, again and again. I reckon I must have replaced that input shaft bushing 3 times before I said enough, walked away, locked the bloody thing in the garage and got involved with my new baby son Ross, who was about 8 months old. At the same time we were in the process of building a new home in The Basin, so it was convenient to forget about the car for a few months. During the process of selling the old house, renting for a few months, and building a new house, the Chev was banished to where I worked in Cheltenham, on the back of a a tow truck I should mention. It was quite handy, being indoor storage in a publishers warehouse, right in the middle of the car section. Became a talking point, but to me at the time, I was over it.
So let's skip forward about 6 months, the house is finished, the garage is ready for the car, and I have finally got the motivation to bring it home. This time on the back of a tandem trailer. A burn up and down the street, noise is still there of course, so lock it in the garage and get on with the new house.
We must now be getting into early 1982 when I raise the motivation level enough to tackle the beast one more time. At the same time I was also seeking advice from others about changing the whole gearbox and tail shaft to a more modern configuration, as I could not see any light at the end of the tunnel. Luckily someone, cant remember who it was, talked me out of it.
So it's here we go again, strip out the box, change the bush, and the rear bearing for good measure, reassemble and go for a test drive, this time up to see my friend Les in The Basin. Half way up the mountain, bloody hell, noise, vibration, you know the story by now. Pull up at Les's place muttering obscenities and both shaking our heads from side to side like a pair of puppets. We are both standing at the rear of the car, with one leg on the back of the tank. No, we were not going to push it into the creek next to Les's place, but who knows? I made some comment about getting this heap of crap home and for reasons unknown climbed on to the back of the petrol tank holding on to the spare tyre, and began bouncing up and down. There was only one problem, the bugger was not bouncing up and down.
*********** BINGO ***********
The first thing I did was to loosen off the uni joint bell housing retainer from the rear of the gear box. This got me home and for several test drives with no noise or vibration.
The problem was caused by two things.
Firstly there was a scar on the torque tube where it goes into the uni joint bell housing. This was fouling with the housing and preventing the torque tube sliding in and out when the rear axle moved up and down over bumps.
The end result of the two causes was that when the car went over a bump and the rear axle moved up and down, the torque tube was pushing upwards on the rear of the gear box.
The problem was easily fixed by welding and grinding the scar on the torque tube back to a smooth finish and fitting the right thickness of gasket to allow the bell to move freely.
Was the problem fixed forever? YES.
Did I learn something from it? YES. Look for clues as to whats causing the problem.
The first clue was - "In the beginning the noise would change pitch and sometimes momentarily disappear when the car went over bumps or was loaded up with passengers"
The second clue was - "Things were quiet for a mile or two, then the noise and vibration started again".
Replacement Transmission Gears - 1986
So here we are in 1986, give or take a year. Hey, I can't remember all the dates. Anyway, when the car was restored, I took 2 calculated risks. The first was a mix matched crown wheel and pinion in the differential. The pinion was from an Adelaide 28 car, and the crown wheel was from the 27 wreck, that my brother in law Colin Bright and I pulled out of a creek at Avonsleigh. Well,we didn't really pull it out, as we watched a farmer do it with a tractor. But we watched and money changed hands, so that's close enough. The crown wheel was actually under water, but with enough greasy oil and muck on it to be fully protected, except a couple of pitted teeth. Put it back together, new bearings etc. Set it up as good as I could and ran the bloody thing untouched from 1972 up to 2007 with out even an oil change. All the old timers said the chance of a non-matched crown wheel and pinion working was very, very slim, and that any noise would gradually get worse and ka boom. Well there was no ka boom, and the noise gradually faded away, or did it blur into all the other noises? Guess that's one for me.
After that long winded explanation of my first calculated risk, let me tell you about the second, which did not work. In 1972, being very green and not having unlimited funds for the project, I rebuilt the gearbox with all new bearings and selected the best, or should I say the least worn gears from the 5 boxes I had. Although I ran this box from 72 until 86, it was obvious that the gears were never going to "bed in" and over this period the gear noise steadily increased. What did I know about case hardening? Not much, but once it,s gone, well, speak up a bit, what's that, I cant hear you!
So I got around it by doing what a few more guys are doing now, short shift the bugger. Get out of first as quick as you can, don't over rev it in second, and again get into top as soon as you can, as that's a direct drive. Well this worked fine for many years until the short shifting was wearing me out more than the gears.
The series of events that happened next are a bit blurry, but it went something like this. I was talking to a truck driver at work one day, who knew a mate from Sydney who knew a Chev parts dealer in Sydney that had a compete set of Chev 4 gears (1916 - 1928). No e-mail in those days just word of mouth and Telecom. Believing this would not have legs I ring the Chev parts guy, and bingo, he does have them.Within the hour I am at the bank withdrawing $550 to give to the mate of a mate who was driving to Sydney that night and would pick them up for me on the way back. Very trusting of me, don't you think?
The next afternoon, Friday, the word comes through from one truckie to another that the gears are on board, and will be back in the morning, Saturday. The driver lived in Tecoma, up in the Dandenongs, and it was a cold frosty morning with me pacing up and down the street as he pulled up. I grab my gears, give him about $30 for his trouble and I'm on my way home.
That set of gears, complete, still had the GMH stamp on the lead seal that secured the wire strapping. To me it was like digging up buried treasure, and even though I have since sourced nearly another complete set on eBay, plus several very good used sets, there was nothing like the feeling of satisfaction that weekend after putting a brand new set of gears into what was then a 58 year old gear box.
Needless to say, no more short shifting, first gear a lot quieter, second gear still a bit noisy as they all are, and top gear fine. I can even rev it out to about 30 to 35mph these days if I'm feeling lucky.
That's enough about repairs, we won't talk about them again until 2007. Let me tell you in the next posting about the only 2 times in 38 years that the car broke down and had to be towed home.
Monday, April 25, 2011
1985 - The Fifth Improvement - Engine Mounts
I am not sure how this improvement came about, and also not sure who put me onto it. It may have been Bill Eldridge.
Chev 4's are pretty noisy and transmit engine noise and vibration through the car, as the engine is bolted directly to the chassis, metal to metal.
The idea was to insulate the motor and transmission on rubber mountings, hard rubber, but rubber never the less. At this time I was working at a furniture company in Bayswater, and had after hours access to not only the workshop, but also overhead cranes, forklifts and other great toys for boys to play with. So it was a Sunday afternoon, and I had done the preliminary stripping of engine bay components in my garage at home. Why there and not in the factory, I can't answer, but then I had to ask my wife to tow the car from The Basin to Bayswater. The car was safely stowed away in the factory and after work the next night I pulled out the engine and trans with the overhead crane. Every workshop should have one.
The process consisted of three stages:
1. Reduced the front engine mount the thickness of a sandwich mount, approx 7/8 inch. That was pretty easy, cut and welded the reduced original mount, fitted the rubber mount and bolted the whole thing back together.
2. The transmission mounts on the cross member were also pretty simple. I threw away the metal spacers that fit between the cross member and the chassis mount, and replaced with approx 1/4 inch hard rubber, which I had drilled holes in to match the chassis mount. I then replaced the bolts with longer ones and fitted a 1/4 rubber pad to go under the bolt head and in between the chassis mount. On the transmission side, I fitted another 1/4 rubber pad to go under the nut and in between the cross member bracket.
Once bolted up the assembly consisted of the following:
* Bolt head
* Large washer
* Rubber pad 1/4 thick
* Chassis mount
* 3/16 rubber pad
* Transmission cross member
* 1/4 rubber pad
* Large washer
* Nut
They key was to compress the rubber pads and inserts to half thickness, which eliminated any chance of engine rock. To achieve this I used very hard rubber to start off with.
3. This is the tricky bit. I used something like a 1 inch round rubber mount, threaded bolt on both sides. Cutting a piece out the top of the cross member, approx 1 inch on each side of the hole where the engine originally sat. I then fitted the engine in place, securing the front and transmission mounts. With the rear engine mounts fitted, but hanging in space, I established the position where the lowered mounting point would be welded onto the cross member. I located the contact point 1/8 inch lower than required, as its easier to pack it up as opposed to being welded in too high. I then removed the engine and welded in the lowered mounting point into place.
The end result was reduced engine noise and vibration. There was and still is no sign of any engine rock or movement, and I tested to ensure there was no forward movement of the engine under heavy braking.


These two photos shows the original type front engine mount, and the sandwich mount that was adapted.The front engine mount was cut reduced by the thickness of the sandwich mount, and re- welded.


Now 25 years later this improvement is taken for granted, but I am glad it was done, even though it was a lot of work at the time.
After 1985 no further improvements (apart from repairs and or breakdowns) would be done on the car until 2009.
Foot note (1st May 2011)
I was prompted by this posting to check the engine mounts, which have remained undisturbed since 1985.
The engine mounts were installed 1984, and during the writing of this blog I decided to check their condition.
Originally thinking it was going to be a minor tidy up, it soon became a big job, taking 2 days and after removing the bonnet and radiator consisted of the following:
Front Engine Mount
I noticed this was a bit softer than it should be. Probably from being continually coated in oil for 26 years. Not a bad run all the same. When I removed the mount it was completely shot. I reinstalled the original full steel engine mount on the front of the engine, and later supplemented this with a 4 mm strip of neoprene rubber between the mount and the chassis, as engine noise increased with the metal to metal contact. After this the car was a lot smoother. As smooth as a 1928 Chev can be that is.
My conclusion is that the front mount had been soft for several years.
Rear Engine Mounts
These are still in good condition, but I will replace them next time the engine or transmission is removed. All I did to these mounts was to insert a 2 mm washer to level off the engine and to match the thickness of the rubber pad under the front mount.
Transmission Mount
The 2 bolts on either side required tightening and I then discovered the rubber pads had been compressed to where they were no longer effective.
The only solution was to replace them, which I did over 2 days. This time I used neoprene 6 mm rubber instead of Goodyear Tyre side wall for the outer pads, and 4mm neoprene rubber instead of 2 mm rubber sheet for the inner pad.
The end result is a smoother engine during acceleration, cruising, and most noticeably when backing off.
Let's hope I get another 20 odd years out of these mountings.
The only other comment of note is how times and things change, and how with modern tools at your disposal, jobs are so much easier. If only in the seventies my garage had contained the following:
Pedestal drill
Variable speed power drill
Bench grinder
Angle grinder
Dremmel
Bench press
Sand blast cabinet
Punches
Nut splitters
Cutting disks
Grinding disks
High speed wire brushes
Butane torch
Etc
Etc
Etc.
Progress is a wonderful thing, tool wise anyway.
1978 - The Fourth Improvement - Water Pump
By now I was keen to make minor changes to improve the overall running condition of the car and reduce a bit of the constant maintenance. Bill Eldridge suggested what turned out to be the second of three mods, that thanks to Bill, made the car run better. This time the target was the water pump. As I recall,the pump I had used to put the car back on the road needed some TLC. After calling Bill, who was not only a vast reservoir of Chev knowledge, but very close by, I was on the way to Noble Park again. Bill's mod consisted of replacing the front housing bush, which was bronze, and required constant oiling, with some needle bearings and an O ring on both sides to retain the grease that was forced into the original oil hole by hand. The modified water pump ran fine from 1978 right through to 2009, when after hearing about a modernised Chev water pump during the Chev 4 Castlemaine Tour, the pump was changed to a unit modified by Ray Hatcher in NSW, but that's another story to be told later.
Sunday, April 24, 2011
1977 - The Third Improvement - Flywheel, Clutch and Pressure Plate
Although I had no idea of what was causing it, I believed there was a problem looming with the clutch. The car was still running ok, not slipping or burning, but there was indication of pending doom, and the clutch pedal was getting progressively softer.
I rang Bill Eldridge, a member of the VDC and a very cluey Chev 4 man, who later went on to start a full time vintage repair business, still going strong in 2011. Bill believed it may have been weak or broken springs on the pressure plate, and suggested a modification to make the clutch more user friendly and serviceable with modern parts. Why not, as Bill knew more about Chevs than I could learn in two life times, and I thought, it's out of sight so it won't detract from the original appearance of the vehicle. So I pulled out the gearbox, removed the pressure plate, clutch plate and flywheel, and headed off to see Bill at Noble Park, a South Eastern suburb of Melbourne.
Bill's process was as follows
1. The original Chev pressure plate (fig 1 and 2.) was discarded, to be replaced by a Valiant (Chrysler) unit (fig 3.)
2. The flywheel which incorporated the housing for the original pressure plate was machined back from approx 2 7/8 inches to 3/4 inch (fig 4,5,7,8.)
3. The flywheel was drilled and tapped to accept the Valiant pressure plate.
4. The carbon clutch throw out bearing was replaced with a modern throw out bearing.
The unit was assembled with the original Chev clutch plate which had been re-lined.
The results were well worth the effort. The engine revved more freely, seemed to pull away better at low speeds, and the clutch operation was smoother. Some believe that with the weight machined off the standard flywheel you may reduce the gyro generated pulling power, however, I never found this to be the case, and was impressed by the more responsive engine. At the time of writing this post (2011) the clutch modification is still performing as good as when it was first installed.
Fig 1. Original Chevrolet Pressure Plate

Fig 2. Original Chevrolet Pressure Plate

Fig 3. Valiant (Chrysler) Pressure Plate

Fig 4. Standard Chevrolet Flywheel

Fig 5. Standard Chevrolet Flywheel. The modified unit was machined from 2 7/8 inches to 3/4 inch.

Fig 6. Standard Chevrolet Flywheel.

Fig 7. Standard Chevrolet Flywheel.

1975 - The Second Improvement - Shockers and Springs
I felt the car was sitting very high at the rear and felt the bumps hard in the rear end. After studying the springs, which were re-tempered and reset during the restoration process, my first thought was that the springs had been re-tempered at a greater angle than the original specifications. This was proved incorrect as on further investigation, I found that I had given the spring works a set of heavy duty springs instead of car springs. This was easily rectified by removing the 3 smallest spring leaves, which then matched the car springs. To further calm down the rear end and smooth out the bumps I also fitted a pair of brand new Leyland P76 shockers that were being sold very cheap after the car had been axed by Leyland.These shockers are still going strong. I have included a series of photos showing the fit of the shockers for others who may want to do similar.


Saturday, April 23, 2011
1975 - The First Improvement - Exhaust System
Within 2 weeks of having the car on the road, there was a problem. The exhaust noise was extremely loud. I had fitted a reproduction system from a dealer in Sydney, and although true to the original design, it finished directly under the drivers seat. Combined with this was a very primitive muffler, which made the already loud exhaust right under the driver. I had done three runs in those first two weeks, the first being to Doongalla, the second to a Friday night meeting of the Vintage Drivers Club, and the third to Cheltenham Victoria, where I was working at the time. Obviously the first run was over shadowed by nerves and excitement, but the second and third resulted in a headache from either exhaust fumes or the noise. I had a passenger on board for the third run, and we could hardly speak to each other.
So the very next morning, Saturday, I headed off to my local exhaust shop seeking a solution. The fix was to extend the system all the way to the rear of the car, which was a legal requirement anyway. The original exhaust was cut just before the muffler, which had very little if any noise suppression capabilities, the pipe was extended to just under the foot well in the rear seat where a muffler with a very pleasing note was fitted, and a tail pipe bent up and over the rear axle completed the system.
The improvement was immediate. The exhaust noise was substantially reduced, and the remaining exhaust noise was behind the car so you were leaving it behind. Exhaust fumes were a thing of the past, and I was able to have a conversation with passengers. There was no loss of power, and although only sound related, the lack of a harsh exhaust note gave the impression the engine was running smoother. This system served me well for approx 10 to 15 years. I am not sure exactly how long it lasted, but then as mild steel systems do, the muffler gave out first, and the rear tail pipe soon followed.
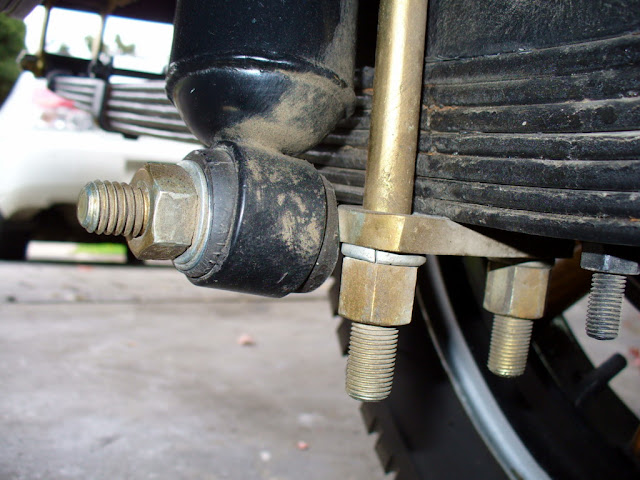
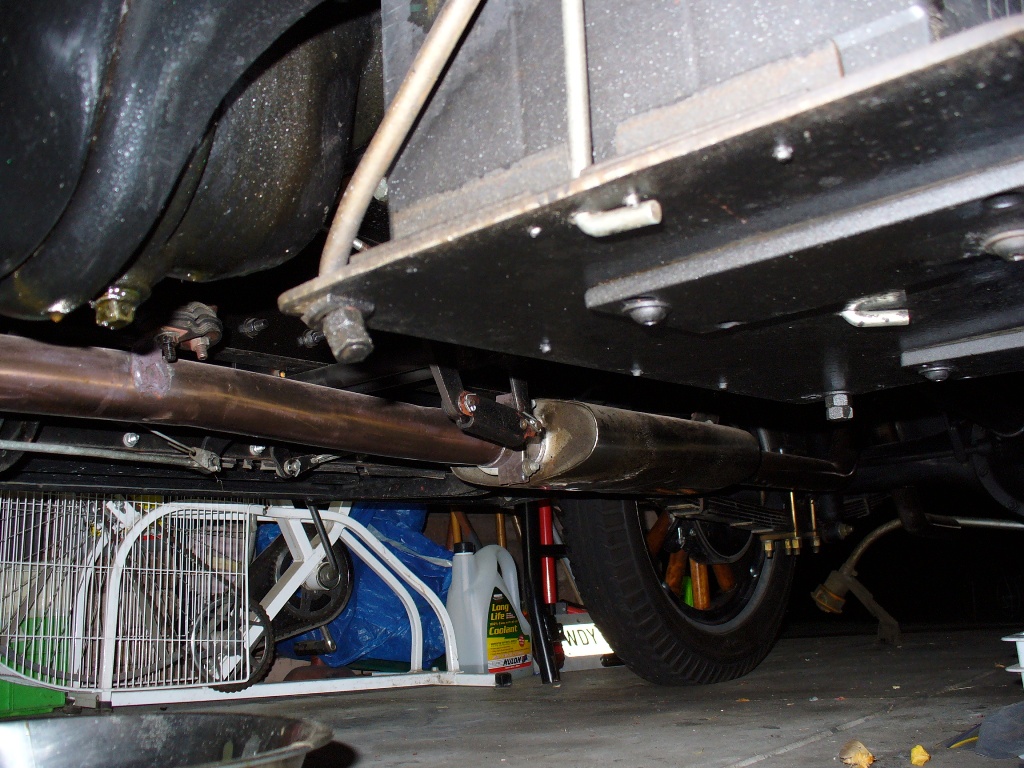
Off to the exhaust shop again, same design, but this time in stainless steel, except for the first 12 inches from the manifold, which was mild steel and incorporated the carby air intake. Being a non- polished grade of stainless I sprayed the rear tail pipe that was seen below the fuel tank in full gloss black.
I am pleased to say this system is still going strong, including the stainless muffler, and should last for many more years. The only changes I have made were during a mini restoration 5 years ago, where I had the whole system polished and it has now changed to a golden colour that I think looks great. I changed the bend on the tail pipe to increase the clearance under the fuel tank as I had fitted a non- vented fuel cap and the heat from the exhaust pressurised the tank and would overflow fuel from the top of the vacuum tank. As well as repositioning the bend on the tail pipe I vented the fuel cap. Problem solved, no more fuel flooding from the vacuum tank.
As the design of the exhaust system has not changed I have posted several shots of the system that I currently run, and that has served me well for at least 15 years.


So the very next morning, Saturday, I headed off to my local exhaust shop seeking a solution. The fix was to extend the system all the way to the rear of the car, which was a legal requirement anyway. The original exhaust was cut just before the muffler, which had very little if any noise suppression capabilities, the pipe was extended to just under the foot well in the rear seat where a muffler with a very pleasing note was fitted, and a tail pipe bent up and over the rear axle completed the system.
The improvement was immediate. The exhaust noise was substantially reduced, and the remaining exhaust noise was behind the car so you were leaving it behind. Exhaust fumes were a thing of the past, and I was able to have a conversation with passengers. There was no loss of power, and although only sound related, the lack of a harsh exhaust note gave the impression the engine was running smoother. This system served me well for approx 10 to 15 years. I am not sure exactly how long it lasted, but then as mild steel systems do, the muffler gave out first, and the rear tail pipe soon followed.
Off to the exhaust shop again, same design, but this time in stainless steel, except for the first 12 inches from the manifold, which was mild steel and incorporated the carby air intake. Being a non- polished grade of stainless I sprayed the rear tail pipe that was seen below the fuel tank in full gloss black.
I am pleased to say this system is still going strong, including the stainless muffler, and should last for many more years. The only changes I have made were during a mini restoration 5 years ago, where I had the whole system polished and it has now changed to a golden colour that I think looks great. I changed the bend on the tail pipe to increase the clearance under the fuel tank as I had fitted a non- vented fuel cap and the heat from the exhaust pressurised the tank and would overflow fuel from the top of the vacuum tank. As well as repositioning the bend on the tail pipe I vented the fuel cap. Problem solved, no more fuel flooding from the vacuum tank.
As the design of the exhaust system has not changed I have posted several shots of the system that I currently run, and that has served me well for at least 15 years.


Friday, April 22, 2011
21st April 1975. The first day on the road


After calling in to visit my friend Les Francis, we set off in convoy, my 28 National Tourer following Les and his wife Jan in their 28 Chev Truck. The two old vehicles must have looked pretty impressive travelling up the fern lined roads climbing into the Dandenongs. The scenery took my mind off the mechanical short comings of a car that had not even been run in engine wise, and still required numerous adjustments to the brakes and clutch just to mention a few. Never was I so happy to sit behind a slow truck.
After what seemed an eternity to a driver that was still learning how to drive double clutch and tame the beast, we ended up at Doongalla, the remains of an old homestead long gone in a fire, but surrounded by beautiful gardens and a breath taking view in all directions.
http://www.worldisround.com/articles/338945/
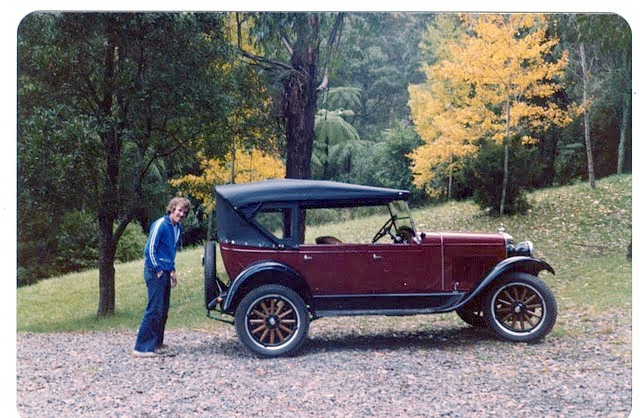
A quick photo stop to catch this young man in a track suit top with hair down to whereever. I wonder where he is now. Back in the cars for the trip back down the mountain and home. Locked her up in the garage, a list of jobs to be done, adjustments, tinkering and re-adjusting, which still goes on today, but the required adjustments are minor and the words "constructive tinkering" are more applicable.
Little was I to know back in 1975 how much a part of my life this piece of machinery was to become, the highs and the absolute lows that would see me in despair walking away in disgust and losing interest for weeks, and sometimes years at a time, then coming back and picking up the tools or firing up the engine as if it was yesterday. But that's what this so called hobby does to you. An obsession? I will let others make that judgement as the postings continue.
1975 - Registration
The day is finally here, after all the hard work, skinned knuckles, late nights and last minute dramas. So off to the Fern tree Gully Police Station I go, in the Chev. Didn't think about trailering it or getting a permit. Don't even know if they were available in those days. So here I am at 23 walking into a police station, already nervous about the registration process, combined with the feeling that normally you are only in such a place when you are either in trouble or there has been trouble.
The Sargent in charge of registration comes to the counter, and we start the paperwork. I produce my hand written receipt for the original wreck, then we had a bit of a debate as the Sargent thought my engine number was not compatible with the year. Turned out to my relief he was reading the wrong page, so all is soon resolved. We go outside for him to check the engine number against what I told him, and he has a bit of a wander around, asking me questions about what I did to the car and how long it took etc.
Back inside to complete the process, and he asks me "what's it worth". Not wanting to say a figure too low, even though I was wanting to keep the charges to a minimum, I said "about $2,500". Immediately he answers back and says "I don't think so". Thinking that I have been caught out attempting to undervalue the car I say nothing, and his next statement was "Lets say $1,500". It was at that point I realized he was actually on my side, he even smiled. I am sent to the next window to pay the registration fee and then return to the counter to receive the plates from the Sergeant. He wanders out with a few sets in his hand, and says "here son these will do nicely". I take the plates thank him very much and get out of there as quick as I could. After work that night when I am fitting the plates, ALO 428, the weight of the world is off my shoulders. The thing runs rough, stopping is a bit hit and miss, but it's on the road, finished enough for me to legally fine tune with testing. It was not till some 20 years later that I realized why he gave me those plates, ALO as in Hello, 4 as in Chev 4 and 28 as in 1928. Anyway that's how people have read the number over the years.
1975 - Roadworthy
Well ready at last to meet the Roadworthy man, and then next to the Ferntree Gully Police Station for registration. I had made an appointment with a Tester in The Basin for a Roadworthy, so after work one night set off for the 2 kilometre trip to the Service Station. Would happen to be a wet night and had a few moments as the brakes were only set in the garage up on blocks. A couple of slips and slides later I arrive at the Service Station, a bit concerned if he wants to take it for a test drive. Luckily for me he did not and gave me a pretty simple test. Roadworthy in hand, I slip and slide my way home to adjust the brakes as quickly as I could. The brakes would continue to be a problem on and off for many years, as my level of experience at that time did not involve realizing the softer the lining, the better the brakes would be. And remember they were not too flash at the best of times. Anyway all is in readiness for the next step, registration.
1975 - Registration? Well Nearly But Not Yet.
This is how I planned the final stages. I would take 2 weeks leave from work, finish off the car, get a roadworthy, and then the registration would be a breeze.
Boy, how wrong could you be.
I started my 2 weeks leave guns blazing, over to Antique Tyre Supplies to purchase 5 tyres, tubes and rust bands. Cost about a months pay. Fitted the tyres to the rims, took hours as I did not have a clue what I was doing, but got there in the end. Then I thought I would paint the rims silver to freshen them up, and then black the tyres. Well the silver part went well, done in the garage with no dramas. The following day I am ready to black the tyres. So what would you normally do? Simple, it's a cold day, so you take your 5 tyres into the house and black the tyres in front of the space heater to help the drying process. Should I mention at this stage that we had brand new carpet throughout the house, and do you know that 3 or 4 sheets or newspaper does not soak up spilt tyre paint before it hits the carpet. Luckily for me I had several hours to try and clean the new carpet before my wife came home, aided by the carpet being a hi low finish with shading. For some reason our lounge room carpet always seemed to have more shading than the rest of the house. Must have been the shadows I reckon. Now talking about the house, which was our first house, and a very vintage car friendly house it was. Apart from the tyre blackening carpet, it had a wall oven that doubled as a paint baking booth, and a bath tub that had numerous parts soaking in near boiling water, such as timber hood bows and upholstery door trims. They don't make houses like that any more.
Back on the subject. The 2 weeks that I thought would kill the project and see me go back to work with a registered car ended up like this. Run around every morning buying bits and pieces so I could work all afternoon and into the wee small hours of the following morning. Those retailers and old motor spares dealers that are now long gone. Vanguard Spares in Elizabeth Street, Melbourne and Anderson Roberts in Hoddle Street, Collingwood, where I picked up full set of Chev Wheel Bolts and the Jax wheel clamps, brand new old stock from a very dusty box. Even managed to get a new 6 volt wiper motor for about $30.
Anyway after my 2 weeks of night shift in the garage the car is on wheels with brakes adjusted sort of, but not road tested, and the engine running a bit rough, but nevertheless getting close to being ready to go on the road.
So my friend Les Francis comes down one Saturday afternoon to help me tune this engine that will just not run properly, some fuel problem, flooding, spluttering etc. We tried changing jets and other parts on this so called reconditioned carby that I had fitted, but with no success. We would tune it, run around the block (illegally I should say) only to return and find it's flooding, and boy was it flooding.
Now let me paint the scene for what happened next which may very well have caused serious injury or even worse. What Les and I did not know was the flooding had been so severe that petrol was running back through the ventilation pipe into the sump. Anyway Les had to go home to get ready for a function, and thank God he did. I came out about ten minutes later and thought I would have one more try to get the damn thing running properly. Cranked her up and boom, the petrol in the sump detonated, the bonnet lifted with this almighty metallic sound, with smoke pouring out of somewhere.
What I then discovered made me feel sick with how close it could have been. The detonation had blown the metal oil filler cap off with such force that it put a dent in the bonnet about a half an inch deep, but more importantly that was the exact same spot Les had been bent over the engine with the bonnet up for the last several hours.
When I regained my composure and rang Les, who even on the other end of the phone realized how lucky he was not to have been there. I turned off the engine that had kept running through the whole detonation process and went to survey the damage. Upset with the dent in my newly painted bonnet I looked underneath and around the engine, no damage, no holes etc. I was told later by wiser heads than mine that Chev 4 engines must be strong, as people had seen sumps and other parts blown off detonating engines, and even if the engine was intact it may still require a rebuild.
In a fit of anger, frustration or plain despair I pulled off this so called reconditioned carby and threw it in the corner of the shed, never to be seen or spoke of again. I went to my spares cupboard, picked up a dirty rusty looking carby body, cleaned it up, fitted new jets, cleaned all the internals, hit it with a coat of full gloss black and fitted it to the car. Engine fired, car ran sweeter and smoother than ever, and would you believe ran perfectly with minor servicing for the next 31 years. Must have been that full gloss black that made the difference. What do you think? That same carby served me well with regular servicing until I came across a factory reconditioned carby from the states, which now runs better still.
As I close off the posting, with the next one to cover the Roadworthy process, I still think what may have been if Les had stayed for an extra ten minutes. Both our lives would have changed dramatically.
1975 - The Final Assembly
Now I may be out by a few months here or there but the years would be correct. It is now 1975 and I have the upholstery just finished, the paint work previously done, looking brilliant, and the drive train finished. The first job after getting the car back from the upholsterers was to bring the engine back to life from under numerous layers of plastic and duct tape that had been used to protect it and my hand made radiator surround from the dangers of the body restoration and repainting. And how close it was to being the unveiling of a disaster. Whilst removing the tape from the radiator surround I come across an angle grinder cut in the tape right at the top of the chrome surround, the area that would be on full show to any one looking at the car. Remove first layer of tape, cut goes deeper, second and third, cut goes deeper. I am then removing the fourth and final layer, and feeling the veins in my neck starting to throb before the stress headache starts, it looks like the grinder has penetrated all layers and cut into the chrome. Now I should tell you at this stage that this surround cost me $350 back in 1974, and my weekly wage was much less than that, probably around $150 a week. Much to my relief the cut through had stopped just on the adhesive backing of the last layer, so when all the dust and dirt was cleaned off, not even a scratch. Boy what a relief.
A week or two has passed and all the engine plumbing and cooling system is connected and ready for the first fire up in the car since it was bench tested. Engine fires into life, a bit rough, but will worry about that later, and boy was that an understatement, as you will read in "Pre-Registration"
So I have a car that will start, idle, but has never been road tested, Why? It ain't got no wheels. Well actually it does have wheels but they are the 1970 Corolla wheels welded onto Chev Hubs that I used to push around during the paint and upholstery process. Just a point of interest that in 2011 those same wheels are still under the house and were used again during a mini restoration many years later.
Next job was to get the timber spoked wheels stained and lacquered, painted and fitted on the car with no tyres fitted. With the car up on blocks but fully "finished" apart from tyres, I have to confess there was many an hour that I spent sitting in the beast, engine running, playing like a little kid with his Tonka Truck.
The next job was simple, fit the tyres, adjust the brakes, tune everything and get a roadworthy and registration. All will be revealed in the next installment "Pre Registration".
Subscribe to:
Posts (Atom)